Monday, September 27, 2010

Heartfelt Thanks

Mondays. Everybody views them differently. Some of us greet them with a big smile and a chipper attitude, ready for whatever adventure will unfold. Others may groan and mourn (I am definitely part of this group!! lol) the end of the weekend, knowing that there's another week of work, packing lunches and busy after-school schedules awaiting them. However you may choose to greet your Mondays, we can always offer a bit of cheer over at The Town Scrapper Blog during our Showcase Mondays. If you stop by for a visit at the beginning of every week, some of the Scrapettes will have gorgeous projects to show you featuring some of the product lines that Phebe carries at The Town Scrapper store.

It's been quite a while since I pulled out one of my Whiff of Joy stamps...too long really! This is "Melinda With Bouquet". Now, I don't think that Phebe has her in stock currently, but she has some other great Whiff of Joy stamps just waiting to find a new home. (she can always place an order for you if there is a particular stamp you are looking for) I have always loved the slightly "romantic" feel of this stamp line....Melinda is beautifully illustrated. I chose to pair her up with some pretty papers from the Basic Grey Porcelain collection. The sentiment is part of a Thank-You sentiment set from CC Designs, which is another company carried by The Town Scrapper.


Copics: Skin: E0000, E000, E00, E11, R20 Hair: E31, E33, E35, E37, E50, E59 Pants: E41, E42, E43, E47, E50 Shirt: RVooo, R83, R85, R89, G20, G83, G85, C5 Wings: RV000, BG000 Bouquet: Y21, Y23, Y17, E35, E50, YG00, YG11, YG63, G99, C5

Hop on over to The Town Scrapper Blog today to see the lovely projects by my fellow Scrapettes...they are such a fantastic group of ladies! While you're there, you can also check out our current challenge on THIS post.

For your stamping and scrapbooking needs, you can contact Phebe at The Town Scrapper by telephone at 519-882-0623 or by email at info@townscrapper.com.

Thanks for visiting today, and have a wonderful Monday!

Blessings,
Melanie

Stamps: Whiff of Joy "Melinda With Bouquet", CC Designs Thank-You Sentiment set
Paper: Neenah, Basic Grey, Bazzill
Ink: Memento, Copics
Tools: Spellbinders
Embellishments: Stickles, pearls

Saturday, September 25, 2010

1 Colour Challenge + 1 Sketch + 1 Krafty Day=A Whole Lot of Kraftin' Kimmie Excitement!!

There are so many great things happening at Kraftin' Kimmie Stamps today...first of all, it's Krafty Day!! By the time this post goes live, I'll be on my way to London to meet up with Kimmie, her family and some of my fellow Krafty Girls to make some final preparations before the doors open in a couple of hours. Kimmie has been crazy busy getting everything ready...some of us headed to London last weekend and took over a table at Scrappin' Great Deals to help out. This is going to be an amazing event, and I cannot wait to meet all of you who are coming!

FYI...For a bit of extra Krafty fun, I thought you all might like to know that Kraftin' Kimmie Stamps is the sponsor for the sketch challenge over Cute Card Thursday this week!! (yet another chance to win some of your favourite stamps!)

We also have our regular weekly challenge today. Krafty Girl and "colourer" extraordinaire Elaine Hughes has brewed up a fantastic colour challenge for you....Purple, Green and Orange. This great colour combo immediately had me reaching for my Halloween Kraftin' Kimmie stamps!

I decided to combine the Cute Card Thursday Sketch along with Elaine's Colour Challenge for my card today. I hadn't inked up Zelda the Zombie yet, so I pulled her out to play this week. Oh my gosh...love her! I coloured her skin green, as her stitches and bolts are so reminiscent of Frankenstein's monster. The papers are from Graphic 45. Love, love, love this paper company! I distressed all paper edges with my scissors and then inked them with Black Soot Distress Ink. The black horizontal panel was distressed, crumpled, torn and adhered while still wrinkled up...gives a bit more dimension to this card. Kimmie has a fantastic set of Halloween Sentiments for all your spooky creations..."happy halloween" is just one of many you'll get in this set.


Copics: Skin: G20, G82, G85, G99 Hair: 100, C10 (courtesy of Andrea....love this marker!), C7 (courtesy of Krista, as mine had totally run dry, lol), C5, C3, C1 and B60 Shorts: YR02, YR07, YR08, YR31 Shirt: V01, V09, V12, V15 (and some black Conte Crayon throughout the image)

We'd love to have you participate this week! Follow along with the colour challenge and make sure to use a Kraftin' Kimmie Stamp for your chance to win the stamp that Elaine used on her AMAZING card this week! You can link up your project on the Kraftin' Kimmie Stamps Blog, and while you're there make sure to take some time to drool over the fantastic projects by the rest of the Krafty Girls and our Krafty Guests! Don't forget that you could double your chances of winning some Kraftin' Kimmie goodies if you also enter in the Cute Card Thursday challenge this week!

That's it for this week! I'm off to Krafty Day...woo hoo!!!!

Thanks so much for stopping by today friends, and I hope you have a lovely weekend!

Blessings,

Melanie

Stamps: Kraftin' Kimmie Stamps "Zelda" and "Halloween Sentiments"
Ink: Memento, Copics, Distress Ink (and a black conte crayon)
Paper: Neenah, Bazzill, Graphic 45

Friday, September 24, 2010

Diamonds and Pearls

Happy Friday stampers!! We have a brand new challenge at Wags 'n Whiskers today..."Diamonds and Pearls"! Just wait until you see what the design team has created this week...wow!

I used "Angelica" on my card today. I paired her up with some pretty Capella papers from Basic Grey. The image was cut out with my Spellbinders. While it was still in the die, I sponged around it using my Inkssentials Blending Tool and Victorian Velvet Distress Ink. (All the paper edges were also sponged with the same ink.) I used an assortment of flat backed pearls and rhinestones, which are my diamond substitute :). The pretty flowers are Prima Hydrangeas...the edges of the petals were lightly touched with more of the Victorian Velvet Distress Ink.


Angelica's wings were coated with Stardust Stickles, as was her sprinkle of "pixie dust".

Copics: Skin: E0000, E000, E00, E21, R20 Hair: E31, E33, E35, E37, E50, E59 Clothes: RV000, Vo1, R83, R85, R89, G20, G83, G85, G99 (and little touches of C5) Wings: RV000, BG10, G20 and the colourless blender


If you join in with our Diamonds and Pearls challenge this week, you could be the winner of a Wags 'n Whiskers stamp...but only if you make sure to use a WnW stamp on your project! You can find the whole line of both rubber and digital WnW stamps HERE.

You can link your project up at the Wags 'n Whiskers Blog. You can also find links there to the DT's personal blogs to find out more about the gorgeous cards they made this week.

Thanks for visiting friends!

Blessings,

Melanie
Stamps: Wags 'n Whiskers "Angelica"
Ink: Memento, Copics, Distress Ink
Paper: Neenah, Bazzill, Basic Grey
Embellishments: Pears, rhinestones, Prima Hydrangeas, Tim Holtz ticket, Stardust Stickles
Tools: Spellbinders

Wednesday, September 22, 2010

Trimming the Tree

Well, good morning friends! You may have noticed that we've had a few changes over at Sundays With Crissy. We have recently made the switch to becoming a monthly challenge blog, with each new challenge being announced on the first day of each month by the lovely Crissy Armstrong. We have also made a change in the posting schedule. Each talented member of Crissy's Crew now has her own scheduled day to post at Sundays With Crissy, as well as posting on her personal blog. This way, we hope to provide you with some inspiration throughout the month to join in with our challenge. As always, there will be a fantastic prize up for grabs for those participants who have used one of Crissy's digital images! Crissy will include the "inlinkz" on her initial post of the month, so make sure to link up all your projects for our challenge THERE...just look for the little blue froggy at the end of her post.

Today is my turn to share a card for Crissy's current "Sparkle and Shine" challenge. I chose to work with one of Crissy's recently released images at Whimsy Stamps. This is "Trimming The Tree". How cute is this little pair? I struggled a bit trying to capture the tone of a polar bear's fur. It's got quite a yellow hue to it in real life, but my first attempt at replicating it was what you might call an"Epic Failure", lol. Good thing I printed this image a few times! This is my second attempt, and I still think I need some work on this colour of fur, but it is much closer to an actual polar bear than my first go! Can you spy all the glittery elements on my card? The pretty swirly DCWV paper is from a glitter Christmas stack. The garland on the tree was jazzed up with some Martha Stewart glitter in Pewter. The star, tree decorations and the trim on the penguin's hat were all coated with Stardust Stickles. The candy canes were coated with Glossy Accents...I know this isn't "glittery" but it sure adds a nice shine to them! (The sentiment is from High Hopes Stamps, and was mounted on a Spellbinders Fancy Tag.)


Copics: Bear: W1, W3, W5, W7, E50 Penguin: C1, C3, C5, C7, Scarf: B91, B93, B95, B97, B99 Hat and Candy Canes: R35, R37, R46, R59 Tree: A whole bunch of greens! (sorry, lost track of these) Star: Y11, Y21, Y17, YR31

We'd love to see your glittery creations using one of Crissy's Digital Stamps! (you can find them at Whimsy Stamps, Squigglefly Stamps or Wags 'n Whiskers Stamps) You can link it up at Sundays With Crissy on THIS post, and if your project features one of Crissy's images then you will be eligible to win this month's prize!

If you haven't seen the beautiful projects posted by some of the members of Crissy's Crew for the "Sparkle and Shine" challenge, please take the time to scroll back through the previous posts at Sundays With Crissy...and don't forget to stay tuned for upcoming posts by the rest of our design team!
Have a wonderful day friends, and thanks so much for stopping by!

Blessings,

Melanie

Stamps: Crissy Armstrong's "Trimming the Tree" from Whimsy Stamps, High Hopes sentiment
Paper: Neenah, Bazzill, DCWV
Ink: Copic Markers (I also added some extra shading with Conte crayons)
Embellishments: Martha Stewart Glitter, Stardust Stickles, rhinestones, black satin ribbon
Tools: Spellbinders Fancy Tags, Bow Easy

Saturday, September 18, 2010

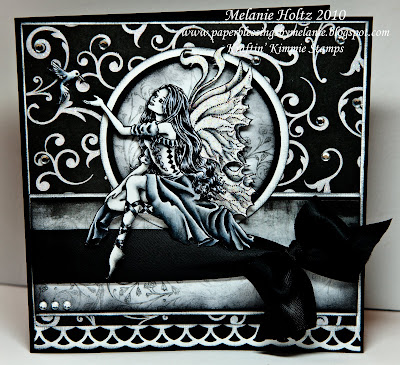
Ophelia...in Black and White

Good morning friends! Are you ready for another challenge at Kraftin' Kimmie Stamps? This week the very lovely and very talented Donna has issued a "Black and White" challenge to us!

I adore black and white photography. I love studying the play of light and the depth of shadows in those photographs. My husband is a photographer, and I love when he plays around with black and white finishes on wedding pictures...they're so beautiful. So I was just thrilled to see Donna's challenge!

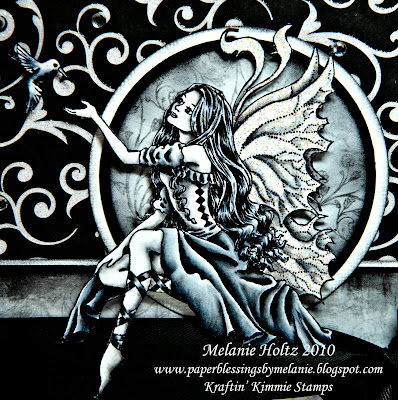
I decided to pull out one of the Kraftin' Kimmie Fairies illustrated by Crissy Armstrong, as it's been a while since I coloured one of them. I adore these stamps...the flowing hair, intricate clothing and delicate features...they are so beautiful. I thought "Ophelia " would be lovely in black and white. I stamped her on Neenah cardstock (Classic Crest Solar White Smooth) with Memento ink and then coloured her with a combination of cool grays. I cut Ophelia out, and eliminated the rock she usually sits on so that I could have her perched on the edge of the medallion made out of my circle Nesties. I also gave her pretty wings some sparkle with Stardust Stickles.


When colouring with Copics, I almost always lay my colour down starting with the lightest colours and work towards the deepest shades. However, when colouring something black, I lay down my darkest shadows first and then gradually transition to the lightest shades. I find this helps to keep the intensity of the deeply shaded areas. The lightest C's behave similar to the blender (in my opinion), and they can really dilute the intensity of your deepest shades. This is why I find it more effective to apply them last, and only blend then into the adjacent shading rather than over the entire area. This is just a personal preference....not a rule! This is just what works best for me.


Copics: 100, C7, C5, C3, C1, B60 (I think this is officially the shortest list I have ever used for an image!)

Conte Crayons: I added in some additional shading with a black Conte crayon and a paper blending stump. I've had quite a few questions about the Conte crayons. I don't always use them....just occasionally. I find they work nicely to give a little more depth to your shading, and they also produce a bit more of a soft, almost smokey finish. You must only use these after your markers though. They are messy, and will get all over the nibs of your markers. They are almost like a mix between chalk and pastel. I usually pick up a little colour from the crayon with my paper stump, and apply it to the deepest shading. I then blend it out very carefully in a slightly circular motion. Use very little at a time, as you can gradually build it up. Also, because they are slightly chalky, you want to be careful not to pick up the colour on your skin and accidentally spread it over other areas of your image. I generally work from the left area of my image towards the right since I am right handed...this way, I avoid dragging my hand across areas that have already been shaded with the Conte crayon.

TIP: I taught a colouring class a while back (along with my partner-in-crime Krista!), and some of the ladies there were talking about having difficultly in identifying a light source, and then creating the appropriate shadows. I suggested to them that they first stamp the image on scratch paper, place a pen/pencil where their light source was located, direct that pen towards their image (like a ray of sun...it just acts as a visual reminder of the direction of your light source) and then try shading it with a pencil...sometimes, when we remove the distraction of colour, the shading suddenly becomes easier to understand. So if you ever have a complex image that is baffling you as far as the shading, try blocking it out in black and white first...you just may be surprised at how it suddenly "makes sense"! Then you can use this as a guide when you colour your final image...and always remember to make full use of your highlights and deepest shadows to create dimension in your colouring. Areas or objects "closest" to the viewer will appear the lightest or brightest, while the deepest shading should be reserved for those areas of an image that are "furthest" from the viewer. Dynamic shading makes your images appear three dimensional...this principal applies to images coloured in black and white as well as in colour.

Ok..class dismissed! lol...kidding.

We'd love to have you join in with Donna's challenge this week! Hop on over to the Kraftin' Kimmie Stamps Blog for some inspiration...the Krafty Girls and Krafty Guests have created some stunning projects this week! Make sure to use a Kraftin' Kimmie stamp (find them HERE) on your project, and you just may be the lucky winner of the stamp featured on Donna's beautiful card this week.

Oh, and we are now officially only one week away from our First Annual Krafty Day!! I cannot believe how quickly September 25th is coming up. I am so excited for this event, and I can't wait to meet all the Kraftin' Kimmie enthusiasts who are attending...you will not be disappointed stampers, as I know this day will be jam packed full of fun! There are still a few spots left, so if you're thinking of attending then check out THIS post for information on registration. I'm really looking forward to hanging out and colouring with all of you!

Thanks so much for stopping by friends!

Blessings,

Melanie

Stamps: Kraftin' Kimmie Stamps "Ophelia"
Ink: Memento, Copics, Conte Crayon
Paper: Neenah, Bazzill, Karen Foster, Best Creation
Embellishments: Ribbon, rhinestones, Stardust Stickles
Tools: Spellbinders Circles

Sunday, September 12, 2010

September Release Blog Hop at Kraftin' Kimmie Stamps!!

Welcome to the release day Blog Hop at Kraftin' Kimmie Stamps! I hope you have enjoyed all the previews over the last few days...I know we all had so much fun colouring up these new images! This new release includes five gorgeous and slightly sassy ladies from the pen of artist Annie Rodrigue(each gal comes with a co-ordinating sentiment). Steven Leary has been a busy artist too, creating several brand new images...Miles and the gang are getting ready for fall as well as celebrating birthdays...Mouse-Style!

As always, Kimmie has an amazing blog hop planned today to celebrate the official release of these new September stamps. Not only will you be visiting each of the Krafty Girls, but also participating today are both Kimmie's artists, some of our Junior Krafty Girls, the September Krafty Guests as well as a few other very talented guests! What a line-up!

Ok...let's go over the rules. The hop begins over at the Kraftin' Kimmie Stamps Challenge Blog, so make sure to start over there where you will find the hop list to help keep you on track. Along the way, make sure to leave comments at each and every blog because some lucky folks will win some packages of the new September stamps!

Let's get this party started!! You should have arrived here from the Challenge Blog, as this is the second stop on the hop!

I'd like to introduce you to "Raychel", one of the gorgeous new ladies illustrated by Annie Rodrigue. I just love her pose...what movie was that where the girl knew the kiss meant true love if her foot kicked up?? Well, Raychel certainly has her pretty eyes set on some special guy...love is in the air folks! The papers used on this card are all from the Basic Grey Olivia collection. The "X and O's" print is absolutely perfect for Raychel, and for the "Hugs and Kisses" sentiment that comes with her. I love it when you find the perfect paper for an image...it just makes the whole project come together so well.


Raychel was stamped on Neenah cardstock and coloured with Copic markers. I glammed up her gloves, belt and shoes with some Stardust Stickles. Although it doesn't show up in the picture, I added a little Smooch Illuminate to her lips for some subtle sparkle...well, and I couldn't resist using a product called "Smooch" on those puckered lips!!


Copics: Skin: E0000, E000, E00, E11, R20 Hair: E31, E33, E35, E37, E50, E59 Dress: RV000, R81, R83, R85, R89 Gloves/Belt: G20, G83, G85, G99

When you are finished hopping, make sure to stop by the Kraftin' Kimmie Stamps online store because all these fantastic new images are now available for purchase!! Oh, and remember the "Gimmie Kimmie's" kits last month? Well, they were such a bit hit that Kimmie is offering them again this month. So, if you want the entire set of new September stamps then just click on the "Gimmie Kimmie's" option and you will be able to purchase them all at a discounted price!

Remember that if at any time you get lost, just head on back to the Challenge Blog for the complete list of blogs...and don't forget to be leaving those comments along the way!

Ok, off you go to visit the very talented artist who brings us the Miles the Mouse stamps...Steven Leary!

Thanks for stopping by and happy hopping!!

Blessings friends,

Melanie

Stamps: Kraftin' Kimmie Stamps "Raychel" and coordinating sentiment
Ink: Memento, Copic markers, Distress Ink
Paper: Neenah, Bazzill, Basic Grey "Olivia"
Embellishments: Smooch Illuminate, Stardust Stickles, pearls, Prima Hydrangeas, machine stitching

Saturday, September 11, 2010

A Girlie-Girl Challenge (and another September KK Sneak Peek!)

September 11th will always be a day that we remember exactly what we were doing when the news broke nine years ago of the terrorist attack at The World Trade Centre. I remember sitting in disbelief and horror with my almost two year old daughter on my knee as the news unfolded on the television. My prayers today are for those of you who lost loved ones that tragic day. May your thoughts be focused on remembering treasured moments spent with those precious people, and may you find joy in those memories. May God touch your hearts with his healing hands, and may you find comfort in His presence and also in your beautiful memories.

Ok, time to switch gears a little now, as I suspect you stopped by today in anticipation of another sneak peek for the Kraftin' Kimmie September Release...have you been enjoying the previews? This release is full of some very glamorous gals and some cheeky little mice up to their usual antics! We'll be showing you another round of sneak peeks today for our weekly challenge on the Kraftin' Kimmie Stamps Blog. Miss Kraftin' Kimmie herself is the hostess for today's "Girlie-Girl" challenge. So, we'd like to see all things pink, sparkly and girlie this week!

As promised, I have a card to show you featuring one of the new September stamps by artist Annie Rodrigue...meet "Samantha"! This lovely gal is getting all dolled up for a night on the town. I trimmed Samantha down to have her fit into the circle frame I made with some of my Nesties. Her, ahem, undergarments were treated to a coat of Smooch Illuminate, as were her lips and lipstick. Her pretty compact was glitterfied with some Stardust Stickles. The brown paper has a glittery pink flower and the teal paper has glittery swirls. (both are from a MME glitter stack...unfortunately not much of the shimmer is showing up in the pics today, so you'll just have to take my word for it! Honestly, this card really does sparkle!) I bought that pretty pink paper from Fancy Pants (Little Sprout "Baby's Breath") specifically for this girly card on my last trip to Skribbles and Scraps. The sentiment "Glamor Girl" comes with another brand new September stamp named "Annette". All paper edges were sponged with Walnut Stain Distress Ink.


Copics: Skin: E0000, E000, E00, E11, R20 Hair: E31, E33, E35, E37, E50, E59 Clothes: V01, R81, R85, R89

If you participate in our challenge this week, you could be the lucky winner of the stamp that Kimmie used on her gorgeous card....but only if you make sure to use a Kraftin' Kimmie stamp on your project! (you can find them HERE) Make sure to check out all of the stunning pink and sparkly creations by the rest of the Krafty Girls and our Krafty Guests on the Kraftin' Kimmie Stamps Blog!

Don't forget to come back tomorrow for our release day blog hop. I'll have a card to show you featuring another brand new stamp by artist Annie Rodrigue. It's going to be a fantastic blog hop with several very talented guests joining in the fun...and of course there will be prizes!

Thanks so much for stopping by friends!

Blessings,

Melanie

Stamps: Kraftin' Kimmie Stamps "Samantha" and sentiment that comes with "Annette"
Paper: Neenah, Bazzill, Fancy Pants (Little Sprout "Baby's Breath")MME
Ink: Memento, Copics, Distress Ink
Embellishments: Dollar store pearls, Stardust Stickles
Tools: Spellbinders, Martha Stewart Border Punch