Tuesday, March 27, 2012

Sneak Peeks and Blog Candy at SCACD!

(Make sure to check out my post BELOW to read about the brand new Kraftin' Kimmie's Klubhouse!! This is one club you will definitely want to join!!)

Hi crafty friends! A new release of exclusive stamps is fast approaching at SCACD, and we are kicking off the sneak peeks today! Here's a word from Susana about this release:

Happy Spring!!!

It's time for another wonderful SCACD Stamp Release!!! We are thrilled to bring you 2 new collections that will capture your hearts thru the eyes of these Beauties!!! I am changing things up by launching some new "branding" for SCACD in this case, Susana Loves Stamps. To be clear it does not mean I personally designed what you are seeing but I did have a part in bringing it forward. Look out for more Susana Loves projects in the works!!!
Eyes of Dreams Collection has 4 stamps and 1 bonus stamp only available when you buy the complete set, plus a sweet discount when you buy the entire set.

Eyes of Beauty Collection has 4 stamps and 1 bonus stamp only available when you buy the complete set, plus a sweet discount when you buy the entire set.
Sharing sneak peeks today are:
***Blog Candy Information***
We have some FUN Blog Candy to give away!!!

One stamp, of Susana's choice, from this release will be given away on each Designer's sneak peek blog post!!! So that will be 5 chances to win a stamp!!!

To enter for the Blog Candy you need to visit Kim and Lorraine and leave a comment (only one comment per person) on their sneak peek blog post before 9 pm (EST) TODAY!!!

A winner will be chosen from both blogs and then posted on the SCACD store blog, at 9:30 pm (EST) tonight!!! Remember, DO NOT leave a comment on the Store Blog for the Candy as it has to be on the Designer showing the sneak peek to enter!!!

Make sure to join us again tomorrow for another sneak peak, and another chance to win. :)

Blessings,

Melanie

Introducing the "Kraftin' Kimmie's Klubhouse"!!

(Please scroll down to the post below to read about the sneak peeks starting today for Susana's Custom Art and Card Design!!)

We are announcing some very exciting news at Kraftin' Kimmie Stamps this week! We are inviting you all to become members of a very special "klub"...check out the full details below!

Introducing the Kraftin' Kimmie's Klubhouse!!


Okay, all you Kraftin' Kimmie KEENERS (and you KNOW who you are), we have some VERY exciting news to share with you!!! Kraftin' Kimmie Stamps is GOING PLACES!

Remember at the beginning of the year when we said we've got some awesome new stuff in store for 2012? Well, we've been planning this for months!!

On Friday, March 30th, Kraftin' Kimmie Stamps will release an EXCLUSIVE Moonlight Whispers stamp set!!! GOING PLACES is the first of our special Krafty Klubhouse Kits…..we'll be releasing a new one every few months!!

Be part of the Krafty Klub and order your exclusive set which features THREE special edition stamps designed by Annie Rodrigue, PLUS FOUR coordinating sentiment stamps! Going Places will be sold ONLY as a set and ONLY at the Kraftin' Kimmie Stamps Shop!! Not only will you get this special set, but you will also receive a special coupon code for 20% OFF, to be used on any additional online order at the Shop the following month!

The Krafty Girls have been busy playing with the new stamps and creating gorgeous samples which we will preview on Thursday at the KKS Challenge blog, with the release going live in the Shop on Friday, March 30th!! We know you'll be as excited as we are for the fun to begin!! See you Thursday!

Blessings,

Melanie

Monday, March 26, 2012

Bitty Boxes

Good morning and happy Monday to all!! After a short vacation, the carts at SCACD are back open for business, and Susana has of course been busy adding more fantastic new goodies to the shelves. :)  Here's just a little taste of what's new:

During our little break, the SCACD design team has been busy in their crafty spaces creating with some of the great products Susana carries. I know that many of the talented ladies have a little something to share today, so make sure to pop by the SCACD store blog where you can find links to all the DT members' blogs. 

I decided to venture outside my comfort zone and make something other than a card. Susana carries these fantastic little Bitty Boxes that are wonderful for altering in a variety of different ways. I also took this opportunity to experiment with some the new Luminarte products that Susana recently began stocking. I have to say that I love them! If you are not familiar with these products, you can check out some great videos by Marti Wills at the SCACD store HERE.

Two of my Bitty Boxes were inspired by Cameo jewelry. For the first one, I covered the box in some Picadilly paper. (you can see the paper in the picture below of all three boxes) The edges were all inked in brown. I then stamped just the head of Loli's Dance in Memento Ink and coloured her with my Copics. I used circle Spellbinders to cut her out and for matting. After adhering her to the lid of the box, I surrounded her with some pearls made with my Viva Decor Pearl Pen in Ice White.


For Bitty Box #2, I layered some Luminarte Silks in Guatemalan Green, Honey Amber and Coral Berry. No fancy method of application here...I just used a paint brush to blot them on and then used my finger to pat and blend. Yes, that's right...I finger painted! lol  For the "cameo" on this box, I stamped Dances With Dragonflies and coloured the skin, hair and dress with Copics. The fairy's wings and the dragonfly's wings were painted with Luminarte Micas. I added a bit of gum arabic and water to the mica powder and then applied them with a paintbrush. I used Pink Azalea, Teal Zircon, and Blue Flame. For the background, I laid down a base coat of E41 and E43 Copic markers. This was then covered with coats of Honey Amber and Coral Berry Luminarte Silks. I matted the image on a Maya Road chipboard snowflake that was painted with brown acrylic paint followed by a coat of the Honey Amber silk. 

My final bitty box was first painted with brown acrylic craft paint. I then applied Honey Amber and Coral Berry Silks and just a tiny bit of the Blue Flame Mica powder (mixed with water and gum arabic). Again, these were applied both with a paintbrush and with my finger. :) I also added a thin top coat of gold craft paint. The lid was decorated with an element from Spellbinders Parisian Accents that was painted brown and gold. It was also heavily coated with a glitter spray that was made with the Luminarte Mica in Solar Gold. Marti shows us how to do this in her video...just combine the mica, a bit of gum arabic and some water in a Mini Mister and spritz away! I love how multifunctional these Luminarte products are. :) The pearls were made with a Viva Decor Pearl Pen. And, um, yes...that is a strand of pet hair. lol Didn't notice that until uploading the picture. Sorry about that! (not sure who the culprit is...we have three cats and a dog, but I'm pretty sure that hair is from our husky. guess I need to brush of my projects a little better before photographing! lol)


Here's a shot from the side so you can see the different finishes:


Ok, that's it for me! Make sure to check in at the SCACD Store Blog where Danni has posted all the newest products. You can also find links to the DT members' blogs there so you can see what they've been creating. 

Oh, and you might want to stay tuned for some more exciting news at SCACD this week...just sayin'! ;)

Thanks so much for stopping by today and I hope you have a wonderful Monday. 

Blessings, 

Melanie

Saturday, March 24, 2012

Going Green With Kraftin' Kimmie Stamps!

Hi folks! It's time for another challenge at the Kraftin' Kimmie Stamps Blog and this week it's my turn to play hostess. I thought it would be fun to use something Recycled or Repurposed on our projects. If you're anything like me, you likely collect all sorts of snippets, trinkets and treasure that you think have crafty-potential...so lets put some of those things to use this week!

For my card, I used the newly released Calla Lily. I really love the look of white cards with lots of layers and embossing, so I thought I'd try to run with that idea...plus I thought that it would really make the image pop if it was displayed on a white background. The background panel was run through my Cuttlebug with the Hedged Maze embossing folder by Couture Creations. The decorative border was made with Spellbinders Parisian Accents. Calla Lily was matted on a Spellbinders Fleur de Lis Pendant. I added it some pearls made with an Ice White Viva Decor Pearl Pen. As for the recycled element on my card, I decided to try to make a flower with some repurposed lace from an old sewing project. Now unfortunately, this did not quite live up to what I envisioned. :(  I've seen some beautiful handmade flowers around blogland, but I think I need to work on it a bit more. I cut several layers of lace in varying sizes of circles. To help them have a bit of shape, I used a flower cardstock base cut with an MFT die. Finally, I used a Kaisercraft pearl brad as a centre and attached it to a Spellbinder Lacey Circle base. The charm is from Blue Moon beads. I added a few jump rings and attached it to the brad.


I paper pieced Calla Lily's dress and shawl with pieces of Memory Box "Minuet" paper. They were shaded with some Copic markers.


Skin: E000, E00, E11, R02  Hair: E50, E31, E35, E37, E59  Shading on dress: BG0000, B91, B45, B97, C5, C7, blender   Shawl: BV31, BV23, C5, C7, blender

Here's a shot of the inside where I used the sentiment that comes with Calla Lily. It was stamped on an element cut with the Spellbinders Parisian Accents set.


If you play along with our Recycled Challenge this week, you could be the lucky winner of Calla Lily, the stamp used on my card...just make sure to use a Kraftin' Kimmie Stamp to be eligible. Pop on over the the KKS Blog to check out what the rest of the talented Krafty Girls have created this week.

Don't forget to check out the Frugal Friday Specials for this weekend!

Oh, and word on the street is that something exciting will be happening at Kraftin' Kimmie Stamps this week!! Make sure to check in at the KKS Blog on Monday to find out the details!

On that note, if you are on Facebook, make sure to check out the Kraftin' Kimmie Stamps page. It's a great place to hang out, chat, share photos and keep up to date on all the happenings at KKS. We'd love to have you join us there. :)

Have a wonderful weekend and thanks so much for stopping by!

Blessings,

Melanie

Sunday, March 18, 2012

Flower Girls, Gnomes and Springtime Lulu...It's Release Day at Kraftin' Kimmie Stamps!!

Good morning krafty friends and welcome to the release day blog hop at Kraftin' Kimmie Stamps!! If you've been following along with the sneak peeks this week you will know that March's release consists of some gorgeous flower girls by Annie Rodrigue, a Flower Sentiment Set, two sets of fun gnomes from Emilie Goulet and an adorable new Lulu set by Cheryl Alger!

The hop begins over at the KKS blog where you will find a complete list of all the Krafty Girls and Krafty Guests participating in today's hop. As you travel along, make sure to leave comments as a couple of lucky stampers will win packages of some of the new March stamps! So, if you've been following along the hop you will have arrived here after visiting with the lovely and amazingly talented Elaine Hughes!! (I absolutely adore Elaine's work!)

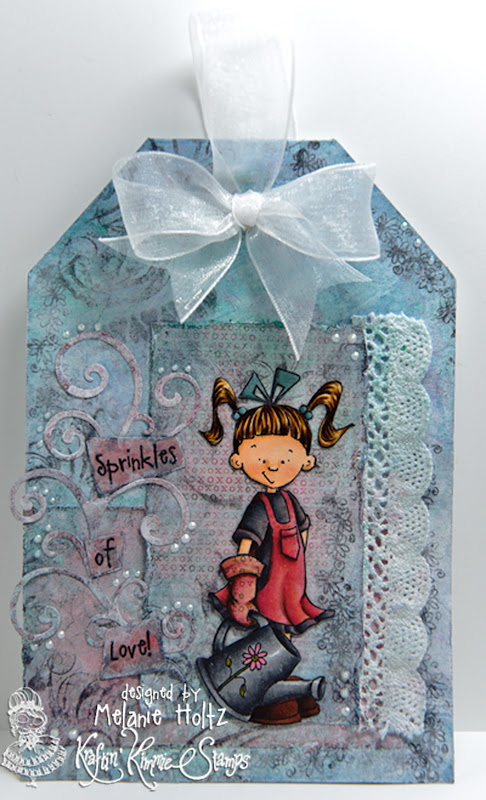
I have two projects to share with you today. The first is a tag featuring one of the three main image stamps from the new Springtime Lulu set. I have also used one of the sentiments included in the set. I have to say that I had a lot of fun playing with a variety of products to create the background on this tag...you should have seen the mess of my table! (and my hands, lol) My first step was to cover a plain white tag with a coat of gesso. I then began to  lay down washes of blue and pink craft paint that had been mixed with a matte medium. Next came some applications of Spun Sugar and Stormy Sky Distress Inks followed by spritzes of water applied with  a Mini Mister. I got back to work with the gesso and craft paint using a paint brush and also a scrap of cardstock to "swipe" colour across the surface. (I think most people would use a palate knife or credit card, but I was too lazy...just grabbed whatever was within reach!) I also experimented with inking up some embossing folders with Stormy Sky Distress Ink and using them to stamp a pattern...not sure you can even see that layer anymore! I also inked up some clear stamps with black ink and stamped a few patterns. Next came more paint, gesso, ink, water and trips to my bathroom to use the hairdryer because I still don't own a heat gun! lol I then added a couple of layers of My Mind's Eye paper that were given the same treatment. (or maybe abuse would be a better term??) I also used an Impression Obsession flourish stamp that was inked with black. (which again, was covered with a few applications of paint and "stuff" to dull down the intensity of the black ink)  So after all that, I figured I need some "glitz". Enter two different colours of Glimmer Mist...went to town with those too. :)  Finally , I adhered my image with the matte medium, a snippet of crocheted trim, a flourish cut with an MFT die, the sentiment and pearls that were created with a Viva Decor pearl pen...these are a fabulous money saver!


Lulu was stamped in Memento Ink on Neenah cardstock and coloured with Copics. The paper-piecing bug hit me again, so I used some of the MME paper to piece her gloves and clothes.


Whew! Still with me??? The next card features one of the stunning new Flower Girls by Annie Rodrigue...meet "Daisy Mae". I have a soft spot for ballerina stamps as my twelve year old daughter has taken ballet since the age of four...she just recently started on pointe work!! So I immediately fell in love with sweet Daisy Mae. :)  I used some beautiful Bo Bunny papers for this card. The medallion behind Daisy Mae was created by cutting two Spellbinders Fleur de Lis Pendants out of the Bo Bunny paper and adhering them to create a circle. The corner embellishments were created with the Bo Bunny paper and one of the elements from the Spellbinders Parisian Accents Set. I used a Martha Stewart border punch on the horizontal paper panel. Usually I ink the edges of my paper, but I felt like doing something a little different. I pulled out some gold craft paint and my matte medium to create a bit of a wash that I loosely applied around the paper edges and over the Spellbinders elements. I also applied a bit of straight gold paint to the edges so that it be a little thicker in some spots. Walnut Stain Distress Ink seldom escapes my inky fingers with cards, and this was no exception. I went over the medallion and corner elements with a bit of the brown ink just to highlight the designs and to antique them a bit.


Daisy Mae was also coloured with Copics. Just the bodice of her costume was paper-pieced as I wasn't sure I could duplicate the tones in the paper. I added some shading to the bodice with my markers. Light washes of gold paint were added to her tutu, bodice, necklace and bracelets. Glamour Dust was applied to the edges of her tutu. I also added a sprinkling of Glamour Dust to the flowers and leaves between her hands. The background was sponged with Antique Linen Distress Ink, but I'm thinking I should have applied some other ink as it is still to stark for the colours on the card. She was matted with Spellbinders Lacey Circles and gold paint was once again used around the paper edges.


Skin: E000, E00, E11, RV95, R02  Hair: E50, E31, E33, E37, E59  Tutu: G20, YG00, YG91, YG95, C7  Pointe Shoes: RV42, RV95, R17, R59, E18, V01...ok, so I struggled a bit with the shoes and just kept piling on the inks, lol. Layer after layer after layer...you get the point! They are still not really what I pictured, so this is NOT a colour recipe that I would actually recommend! But I wanted to share that sometimes you have to just experiment. Sometimes your experiments will be successes, and sometimes not. Sometimes you might go through multiple colour combos before you come up with something you're happy with. Just keep practicing...be willing to make mistakes and then learn from them. See what colours work together and what colours do not. Take notes and use that knowledge in future projects. Be encouraged and don't be afraid to experiment with your colours.  :)

All of the new March stamps are now available for purchase at the Kraftin' Kimmie Stamps Online Store!! The Gimmie Kimmie Kits will again be available by artist and at a discounted price, but only for a limited time so act fast if you want one.

It is now my pleasure to send you off to visit with the talented Sharon Caudle...just wait until you see what she has to share with you! Don't forget to leave comments at each blog for your chance to win some of the new stamps!

Thanks for joining us today and I hope you have a wonderful Sunday. :)

Blessings,

Melanie

Saturday, March 17, 2012

Winner of the Copic Colouring Guide 2!!

(If you are looking for the Kraftin' Kimmie Sneak Peeks and weekly challenge, please feel free to scroll down to the post below...and make sure to read for details on how you could win some of the new stamps being released tomorrow!)

I know this post is terribly overdue, and I want to thank you all for waiting patiently! I am so sorry for keeping you all waiting, but I was holding off on announcing the winner of my copy of the Copic Coloring Guide 2 until it arrived safe and sound in my mailbox...which it did Thursday afternoon!

Drumroll please!!!!

The winner, as drawn by random.org is:


Congrats Carol!! I have already been in touch with Carol, and her copy will be in the mail Monday. :)

I wanted to say a HUGE thank you to everybody who left such lovely comments during the blog hop...I truly appreciate all the kind words. Thanks as well to those who signed up as followers on my blog. :)  

This really has been such an amazing experience and again, it's an honour to be included among the talented designers who participated in this book. Marianne and Colleen have done an incredible job with this book and I know that it will be a valuable tool to assist everybody on their colouring journey. So even if you were not among the winners of the Copic Coloring Guide 2, I encourage you to purchase a copy to keep close at hand in your crafty space. 

Happy colouring!!

Blessings, 

Melanie

Rose (Kraftin' Kimmie March Sneak Peeks Continue!)

(If you have been waiting to find out who won my copy of the Copic Coloring Guide 2 from the release blog hop, please check back at 12:00 pm EST today to see who the lucky stamper is!)

Good morning and happy Saturday to you! Today's Kraftin' Kimmie Stamps sneak peeks are in conjunction with our weekly challenge, and we're sharing previews of the new March stamps by Krafty Artist Annie Rodrigue! This month, Annie has designed a collection of gorgeous flower girls. To coordinate with Annie's lovely new images, Kimmie has also designed a set of Flower Sentiments that you might spy on some of the Krafty Girls' creations today. :)

We've got a fantastic Sketch challenge this week courtesy of our lovely hostess Alice Wertz! For my card, I've used the lovely Rose. I had a lot of fun colouring her up at Kimmie's house last weekend when a few of the Krafty Girls enjoyed a full day of fun, colouring, food and movies!! Truth be told, I didn't finish colouring her...actually I only coloured bits of pieces of a few images! lol  I'm am definitely not a productive stamper at our get togethers...I spend to much time visiting! These gorgeous paper are all from Bo Bunny. I used my oval Spellbinders to cut Rose out and for matting. The decorative border on the horizontal paper panel was cut with Spellbinders Parisian Accents. The corner accents were all created with dies from the Parisian Accents set. For the upper embellishment, I layered two corner accents that I nested together on top of a circular medallion. The lower accent consists of two nested corner accents. All these elements were cut from sheets of the Bo Bunny paper. The "LOVE" sentiment comes with Rose and was cut and mounted with Spellbinders Labels 4. All paper edges were inked with Walnut Stain Distress Ink. (I think I use that ink on about 90% of my cards...maybe closer to 98%! lol)


Rose was stamped with Memento Ink on Neenah cardstock and coloured with Copics.


Skin: E000, E00, E11, R20  Hair: E50, YR31, E33, E35, E97, E18, E59 Dress: G20, YG00, YG91, YG95, C7 Sash: BG000, B02, B05, B37, B60, C7  Roses: R30, E32, R35, R59, C7  Vine: E13, E17, E59 Background: E40, E42, E43, blender

On the inside of my card, I used one of the sentiments from the new Flower Sentiments Set. It includes nine different sentiments. As with all of the larger Kraftin' Kimmie sentiment sets, they are perfect for multiple occasions and projects. They can be used in conjunction with main image stamps on the front of cards or to complete the inside of cards as I have done here. They would also be lovely as the focal image on smaller note cards or tags. They would be wonderful to include in mixed media pieces, journals, scrapbooks, Smashbooks...so many possibilities! The papers are once again from Bo Bunny. To create the inside panel, I trimmed around the edge of the swirls on the brown paper and merged it with the cream paper. The pretty designs on these papers made it easy to finish off the inside with a bit of style...all they needed was a bit of that Walnut Stain Distress Ink! Oh, and the sentiment was also stamped in the Distress Ink.


Oh, and here's Alice's fabulous sketch!


Make sure to visit the Kraftin' Kimmie Stamps Blog to see what the rest of the talented Krafty Girls and Krafty Guests have created for today's challenge/sneak peeks. If you play along with our challenge this week, you could be the very lucky winner of the stamp seen in Alice's beautiful card. (just make sure to use a KKS to be elibible.)

***BLOG CANDY***

Don't forget to hop around and leave comments for each Krafty Girl and Krafty Guest participating in today's sneak peeks because Kimmie will be drawing two lucky winners!! Each winner will receive three of Annie's gorgeous new flower girl stamps! The winners will be announced tomorrow on the KKS blog...good luck!

Have you been busy making your wish lists during our sneak peeks?? All the new stamps will be available for purchase tomorrow, and we'll be celebrating the release with a fun blog hop showcasing the March stamps...hope you can join us!

Blessings,

Melanie