Showing posts with label Altered Projects. Show all posts

Saturday, March 31, 2012

Quick Craft Ideas

Happy Saturday to all my crafty friends out there! I though I'd pop on with a couple of craft quickies. If your schedule is anything like mine, you probably have to squeeze your crafty moments in whenever you can. I am typically a slow crafter, so most of my cards are done over several sessions between colouring, choosing embellishments, deciding on a layout, cutting and assembling...it's quite the process!

As much as I love making detailed cards and projects, sometimes it nice to pull out a minimal number of products and tools and finish off a project in a relatively short time period. I have a few such projects to share with you today that use some Viva Decor products available at SCACD. They are super easy and quick to create...although they will require a bit of drying time.

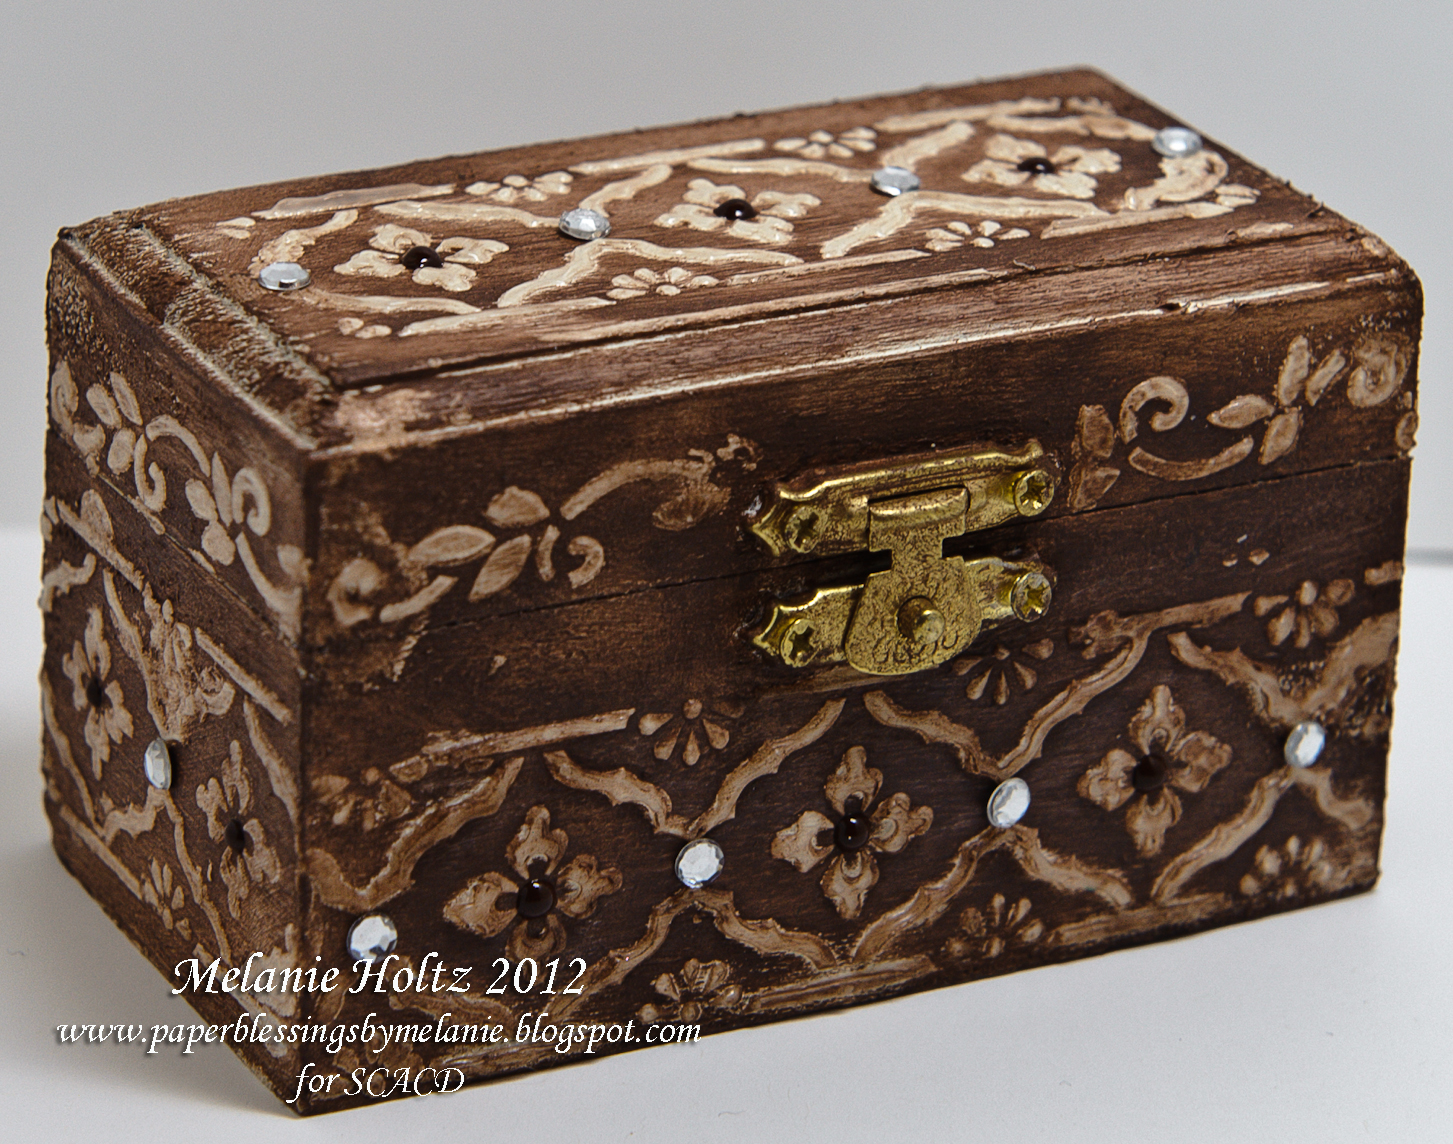
First up is a little "treasure box". This is just a cheap wooden box I picked up at my local dollar store. Using a stencil I've had kicking around for a while, I applied some Viva Decor Crystal Gel with a palate knife to the box. Susana has a fantastic assortment of Stencils in stock at SCACD. The Crystal Gel is a fun product that dries clear and holds it's dimension so it's perfect for adding texture to all sorts of surfaces. After allowing the gel to dry completely, I applied some brown acrylic craft paint to the box. I wasn't terribly neat with the application as I wanted it to have a kind of "antiqued" look. I also used a rag to help rub the paint into the wood and to buff it off of the gel. I also added a few rhinestones for just a bit of bling. :) The pearls were made with a Viva Decor Pearl Pen.


While I had the Crystal Gel and stencils out, I looked around for something else I could play with. I had a few kraft envelopes sitting on my desk, so I pulled them over. Again, I used a stencil and applied the gel with a palate knife.

After the gel was dry, I sponged brown ink on the first envelope to highlight the pattern and added some brown pearls with a Viva Decor Pearl Pen.


For the next envelope, I coloured the dried gel with my Copics, sponged around the edges with brown ink, added little groupings of pearls with the Viva Decor Pearl Pen and topped it off with a little rhinestone at the bottom. I really love my Viva Decor Pearl Pens. They really are a fantastic money saver as you can get so many pearls from just one pen. I use my brown one a lot, and I've hardly made a dent in it! I also love that you can customize the size of your pearls. As you can see in the envelope below, I was able to make pearls of assorted sizes.


Again, these are some old stencils I had kicking around...they were quite flimsy self adhesive ones that tore after I was done with them, lol. If I had been patient, I would have waited until my GOOD stencils arrived from SCACD. However, I am not patient and I wanted to play with my Crystal Gel! lol  I have since purchased some stencils and am looking forward to putting them to use in future projects. I really hadn't thought much about using stencils in my projects until recently. They are so versatile and can be used with so many different mediums like paint, ink, sprays, gels, markers, modelling paste...the possibilities really are only as limited as your imagination. :)  You can find Susana's stencils here HERE.

So those were my Saturday craft quickies.  They were fun and easy to create...and they allowed me to get messy with some great art products, which I love to do. :)

Don't forget to check out the newest Susana Loves Stamps release...these stamps are beautiful! Susana has also been busy adding many great new products to the store. Remember, Susana also carries a ton of products for all you mixed media fans! From canvases, to stencils, to tags, to paints, to sprays...she's got you covered! She recently brought in some fabulous Dylusions products which look incredible! The Luminarte products are also a beautiful line that work well with both traditional paper crafts and canvas art. So grab yourself a cup of coffee or tea and take a good look around SCACD...nothing better than shopping in your jammies with a hot coffee in hand. ;)

Hope you all have a great weekend!

Blessings,

Melanie

Monday, March 26, 2012

Bitty Boxes

Good morning and happy Monday to all!! After a short vacation, the carts at SCACD are back open for business, and Susana has of course been busy adding more fantastic new goodies to the shelves. :)  Here's just a little taste of what's new:

During our little break, the SCACD design team has been busy in their crafty spaces creating with some of the great products Susana carries. I know that many of the talented ladies have a little something to share today, so make sure to pop by the SCACD store blog where you can find links to all the DT members' blogs

I decided to venture outside my comfort zone and make something other than a card. Susana carries these fantastic little Bitty Boxes that are wonderful for altering in a variety of different ways. I also took this opportunity to experiment with some the new Luminarte products that Susana recently began stocking. I have to say that I love them! If you are not familiar with these products, you can check out some great videos by Marti Wills at the SCACD store HERE.

Two of my Bitty Boxes were inspired by Cameo jewelry. For the first one, I covered the box in some Picadilly paper. (you can see the paper in the picture below of all three boxes) The edges were all inked in brown. I then stamped just the head of Loli's Dance in Memento Ink and coloured her with my Copics. I used circle Spellbinders to cut her out and for matting. After adhering her to the lid of the box, I surrounded her with some pearls made with my Viva Decor Pearl Pen in Ice White.


For Bitty Box #2, I layered some Luminarte Silks in Guatemalan Green, Honey Amber and Coral Berry. No fancy method of application here...I just used a paint brush to blot them on and then used my finger to pat and blend. Yes, that's right...I finger painted! lol  For the "cameo" on this box, I stamped Dances With Dragonflies and coloured the skin, hair and dress with Copics. The fairy's wings and the dragonfly's wings were painted with Luminarte Micas. I added a bit of gum arabic and water to the mica powder and then applied them with a paintbrush. I used Pink Azalea, Teal Zircon, and Blue Flame. For the background, I laid down a base coat of E41 and E43 Copic markers. This was then covered with coats of Honey Amber and Coral Berry Luminarte Silks. I matted the image on a Maya Road chipboard snowflake that was painted with brown acrylic paint followed by a coat of the Honey Amber silk. 

My final bitty box was first painted with brown acrylic craft paint. I then applied Honey Amber and Coral Berry Silks and just a tiny bit of the Blue Flame Mica powder (mixed with water and gum arabic). Again, these were applied both with a paintbrush and with my finger. :) I also added a thin top coat of gold craft paint. The lid was decorated with an element from Spellbinders Parisian Accents that was painted brown and gold. It was also heavily coated with a glitter spray that was made with the Luminarte Mica in Solar Gold. Marti shows us how to do this in her video...just combine the mica, a bit of gum arabic and some water in a Mini Mister and spritz away! I love how multifunctional these Luminarte products are. :) The pearls were made with a Viva Decor Pearl Pen. And, um, yes...that is a strand of pet hair. lol Didn't notice that until uploading the picture. Sorry about that! (not sure who the culprit is...we have three cats and a dog, but I'm pretty sure that hair is from our husky. guess I need to brush of my projects a little better before photographing! lol)


Here's a shot from the side so you can see the different finishes:


Ok, that's it for me! Make sure to check in at the SCACD Store Blog where Danni has posted all the newest products. You can also find links to the DT members' blogs there so you can see what they've been creating. 

Oh, and you might want to stay tuned for some more exciting news at SCACD this week...just sayin'! ;)

Thanks so much for stopping by today and I hope you have a wonderful Monday. 

Blessings, 

Melanie

Thursday, October 20, 2011

Frosty Fun...October Kraftin' Kimmie Sneak Peeks!!

Good morning folks. We're kicking off the October sneak peeks at Kraftin' Kimmie Stamps today! But  before getting to today's project, I just wanted to share a bit about Krafty Day 2011 that was held this past Saturday near London, Ontario. What an amazing day! The doors opened at 9:00 am for attendees to come in, claim their seats and set up their krafty stations. Tables were piled high with Copic markers, Cuttlebugs, stamps, ink, dies and paper cutters. Kimmie opened the morning with announcements and everybody spent a bit of time enjoying refreshments and shopping both at the Kraftin' Kimmie Stamps display and at Scrappin' Great Deals who joined us for the day. :)  Oh my goodness, you should have seen the wall behind the stamp displays...it was COVERED with gorgeous cards made by the Krafty Girls!! It was quite the sight to behold. :)  Two make and takes were run in the morning by Krista VanTol and Kerry Johnson, and two more were run in the afternoon by myself and Tara Godfrey (with the assistance of her lovely daughter Hannah!). Door prizes were awarded throughout the day and we raffled off four packages of cards made by the Krafty Girls with all proceeds going to the Canadian Cancer Society. One of the highlights of the day was of course having Krafty Artist Annie Rodrigue at our event!! Annie had her own table set up with sketchbooks for us to peek though (they were absolutely incredible!), watercolours, inks and samples of her work. She created a GORGEOUS inked piece featuring Batty and Catty that was also raffled off for charity...she certainly made one of our attendees a very happy lady!! I had a wonderful time connecting with fellow Kraftin' Kimmie Stamp fans and colouring enthusiasts. I'd like to say hello to all the wonderful ladies who attended...it was great to see some familiar faces from last year and to have the opportunity to meet some new friends as well. Thank you to all who helped make this a great event...I'm already looking forward to next year!

The excitement continues this week with our October sneak peeks!! We will be sharing previews of the new stamps each day leading up to the release day this Sunday. Today, the Krafty Girls are sharing projects featuring the newest stamps by Krafty Artist Cheryl Alger.

My project today features "Sending Winter Hugs". I absolutely adore snowmen and I think this little guy is so cute. :) I was recently in Michaels and found some great wooden tags that I thought would be fun to play with. I painted the tag with white acrylic paint and covered it with some paper from the Bo Bunny Blitzen collection. I first stamped the image on Neenah, coloured it with Copic makers and then cut it out. As the stick arms are much too delicate to cut out, I also stamped the image directly on the design paper so that I could basically paper-piece the snowman's body and still include those cute stick arms. I applied white acrylic craft paint to the tag and sprinkled it generously with Glamour Dust. I also mixed some Glamour Dust into a thin wash of acrylic paint and painted over the snowman's body. (which basically covered up any shading I had created with my Copics, lol. But he is cute and glittery now!) The little "Fun and Frosty" tag is from the Blitzen paper pad. I added a bit of ribbon and an acrylic snowflake from the dollar store that I coated with Stickles.  This was a really easy and fun project to put together...it would also be a great project to work on with your kids. :)


(Unfortunately the glitter-factor of this tag didn't show up in the photograph, but it really is super sparkly with all the Glamour Dust and Stickles...and I was pretty glittery myself by the time I was done! lol)

To see more projects featuring the soon-to-be-released October Kraftin' Kimmie Stamps by Cheryl Alger, please visit the Kraftin' Kimmie Stamps Blog for links to the Krafty Girls sharing previews today.

Oh, and can we interest you in a little BLOG CANDY??!! All you need to do is leave a comment for each Krafty Girl sharing a sneak peek today and Kimmie will draw a winner who will be announced on the Kraftin' Kimmie Stamps Blog tomorrow. You could be the very lucky winner of all three of Cheryl's new October stamps! :)

Thanks for stopping by for a peek today, and I hope you plan to join us tomorrow when we'll be sharing projects featuring stamps by yet another Krafty Artist!!

Have a wonderful day my friends. :)

Blessings,

Melanie

Stamps: KKS "Sending Winter Hugs"
Ink: Memento, Copics
Paper: Bo Bunny Blitzen
Embellishments: Glamour Dust, Stickles, Ribbon, acrylic snowflake, machine stitching
Other: White acrylic craft paint

Saturday, January 29, 2011

Reduce, Reuse, Recycle...with the Krafty Girls!!

Good morning friends! Time for another challenge over at the Kraftin' Kimmie Stamps Blog, and this week it's my turn to play hostess! My challenge gives you a chance to go a little green, and perhaps even save a few pennies in the process...Reduce, Reuse, Recycle!!! So this week, I want to see at least one recycled item on your project. :)

I must confess...I am frugal. Well if you ask my husband, he might just choose to use the word "cheap", but that has such a negative connotation! I salvage and hoard all sorts of various items that may come in handy for something crafty. I am getting a bit more discerning with what I keep though, as I only have so much room to store it all! Ribbon from beautifully wrapped gifts immediately goes into my ribbon stash. Sometimes you find really funky little tags that might come on gift boxes or clothes...those find their way into my crafty bins too. Let's face it, some of our products for cardmaking can be pricey, so it's nice to save a little money where we can! It's also a great way to reduce garbage, and to help out our environment!

For those of you who don't know, my day job is at a cardiologist's office. During the holiday season, many of our wonderful patients bring in boxes of chocolates, trays of homemade goodies and lovely cards that always put a smile on our faces. This year, one patient brought in a box of Quality Streets chocolates in a funky little box with a magnetic closure...I called dibs on that box as soon as I saw it!! (and NO I did not eat ALL the chocolates!! I may have indulged in a few though, lol) I thought it would provide the perfect base for a fun altered gift box...and the front panel provided plenty of room to showcase one of Kimmie's stamps!

I chose to ink up Stella Strawberry for my box and paired her up with some great papers from October Afternoon...how perfect were these sheets with strawberries on them??!! I also found that cute little strawberry charm in my box of embellishments. The bow was tied with my Bow Easy. Before adhering my bow, I always cinch in my bottom of strip of my ribbon with a bit of thread so that it looks like the ribbon is all one piece...nobody will ever know that you cheated by using a bow-tying tool. Um...well, they won't know unless you come out and tell them on your blog. :) lol


I stamped Stella Strawberry on Neenah Smooth cardstock with Memento Tuxedo Black ink and coloured her with my Copic markers. I used a bit of the red polka-dotted background paper to paper-piece her underskirt. If you plan to paper-piece any areas on your image, make sure to add in some shading with your colouring medium of choice to prevent the area from looking flat. (I used my colourless blender, R20, R37, R59 and C9 on the underskirt)


Copics: Skin: E000, E00, E11, E21, R20 Hair: E50, Y21, Y23, Y26, YR31, E31, E33, E37, E59 Dress: BG000, BG10, BG11, BG23, BG78, C9, E50, E41, E42, E43, E47, R000, R20, R37, R59, YG00, G20, G82, G85

This is what the box looked like before I got my hands on it. :)


I added an accordian-fold flower to the top of the box.


Here's a little peek at the inside. There was a method to my madness you see...I had in mind to put together a strawberry themed gift package...body butter, shower gel and a fun bath pouf! Custom gift packaging is so much fun to create, and it adds such a personal touch to your gifts.


We'd love to have you play along this week...if you do, you could win "Stella Strawberry", the stamp I used on my project today! Just make sure to use at least one recycled item and a Kraftin' Kimmie Stamp on your project and then link it up at the Kraftin' Kimmie Stamps Blog. While you are there, make sure to check out the projects by the rest of the Krafty Girls and Krafty Guests...they are AMAZING!!

Did you order the new January stamps?? You can find them at the Kraftin' Kimmie Stamps Online Store. If you had a hard time making up your mind on which stamps to order, Kimmie has her Gimmie Kimmie Kits still available for a limited time...one click, and you can order each artist's stamps as a separate collection at a discounted price!

Thanks so much for stopping by today friends, and I hope you have a wonderful weekend!

Blessings,

Melanie

Stamps: Kraftin' Kimmie Stamps "Stella Strawberry"
Ink: Memento, Copics, Walnut Stain Distress Ink
Paper: Neenah, Bazzill, Kraft cardstock, October Afternoon
Embellishments: Machine stitching, ribbon, strawberry charm, KaiserCraft pearl brad
Tools: Spellbinders Lacey Circle, Bow Easy

Friday, June 11, 2010

Distressed Digis

(This is one of two posts today!! Please scroll up for the Kraftin' Kimmie June Previews!)

Welcome stampers...thanks for visiting today. There are some great things happening over at Wags 'n Whiskers!! Today marks the release day for another set of DIGITAL STAMPS!! That's right...some of your favourite rubber stamps are now also available as digis!! We also have a great new challenge over at Wags 'n Whiskers this week courtesy of the wonderfully talented Michele...Distressing Time! So get out those edge distressors, inks, rulers, scissors or whatever your favourite distressing tool is and get creating!

The image I'm using today is actually the same one I used for the challenge two weeks ago (you can see that post here), but I thought I would show you how the digital version opens up even more possibilities to stretch your creativity! This is "Say A Prayer"...I just love this pretty image. Before printing "Say A Prayer", I re-sized the image and flipped it (more on this in a moment). I found this great wooden cross at my local dollar store (yup, I'm a bargain junkie...the pearls are from the dollar store too!) and painted it with an ivory acrylic craft paint. I chose this gorgeous vintage paper from TCP and distressed the edges before adhering it to the cross. I used Brushed Corduroy Distress Ink on both the cross and the paper edges.


I wanted to mount "Say a Prayer" on a Spellbinders Fleur De Lis pendant, so I first measured the die to determine what size the image should be. When adjusting the size of your digis in your computer program, make sure to click on the "Keep Scale" option so the proportions will all remain accurate. After pop dotting her onto the pendant, I realized that the Copics were just a bit too vibrant for the muted vintage feel of this project. So out came the Antique Linen Distress Ink, and I very lightly applied it with a makeup sponge over the entire image until it was a better match for the paper. I did add a touch of Stardust Stickles to her wings for just a little glitz. Finally, I lightly touched a bit of Brushed Corduroy to the edge of the image.


Would you like the chance to win a prize from Wags 'n Whiskers?? Then come on over to the W&W blog to play along with us! You'll find some beautiful inspiration from the rest of the Divas to get your creative juices flowing! Just make sure to use a Wags 'n Whiskers stamp or digital image on your project if you want to be eligible for the prize. You can buy Wags 'n Whiskers stamps/digis HERE.

We can't wait to see your Distressing skills!

Blessings,

Melanie

Digital Stamp: Wags 'n Whiskers "Say a Prayer"
Paper: Neenah, TCP
Ink: Copic markers, Distress Inks
Tools: Spellbinders Fleur De Lis Pendant
Other supplies: Wooden cross decoration and pearls from the dollar store

Sunday, May 23, 2010

Layer it Up at Sundays With Crissy!!

Good afternoon stampers! I hope your weekend has been peaceful and relaxing. It's time for another new challenge at Sundays With Crissy!! Crissy posts a new challenge every two weeks and has a fantastic prize give away for a lucky participant at the end of every month. Remember that to be eligible, you MUST use one of Crissy Armstrong's digital images. Want to know what Crissy is giving away this month?? It's one of my all-time favourite Spellbinders sets...Fancy Tags!! If you do not already have any of Crissy's digital images, you can buy them here

Ok, the challenge for the next two weeks is "Layers"!! I chose to work with the digital stamp "Thinking of You" available at Wags 'n Whiskers. I though it would be fun to do something other than a card this week. This little wooden box from the dollar store is just the perfect size to hold a small journal and some mini glitter gel pens (also dollar store finds)...just perfect for a little girl to record some of her thoughts and dreams! How many of you kept diaries as kids? I guess some of us still do, although "journal" sounds a bit more grown up! All the design paper on this project is from K&Company. I cut several layers of paper with various Spellbinders and then pop-dotted the image for some added dimension. I also added some layered Prima flowers.


After printing "Thinking of You" on Neenah, I coloured it with my Copic markers. I also printed off just a portion of the image on K&Company paper so I could paper piece her shirt. I love how this technique allows the clothing to be patterned! After gluing the piece in place, I added some shading with my Copics so that it would not look too flat. Thought I'd try my hand at shading over my Copics with some pencil crayons blended out with OMS...I only did this on her pants. I have a limited supply of Prismas, but I really love the soft blending some artists achieve with them. The little kitty was shaded further with some Conte crayons and a blending stump.


Here's a peek inside the box. I also included a little pocket inside to hold some stickers, or perhaps even some stamps for sending off letters to a loved one. My daughter has already called dibs on this! I was hoping to stash it away so that I could surprise her with it, but she spied it while my hubby was photographing it. Actually, she probably would have seen it anyway...do you know what she told me she did the other day?? She "googled" me at school to show her friends that I'm on the Internet!! lol Apparently the kids were all looking in on my blog! Guess I should give a shout out to all Ainsleigh's friends....HI KIDS!!


You will be absolutely blown away by what the rest of Crissy's Crew has created this week! Have I mentioned how blessed I feel to be a part of this talented design team?? Grab yourself a cup of coffee or tea, and hop on over to Sundays With Crissy to see their lovely projects.

Remember, you have two full weeks to complete a layered project for our challenge. When your project is complete, make sure to link it up to Sundays With Crissy so that your name will be in this month's prize draw...just make sure to use one of Crissy's many digital images!

Have a blessed Sunday,

Melanie

Digital Stamp: "Thinking of You" by Crissy Armstrong available at Wags 'n Whiskers Stamps
Ink: Copic markers, Distress Inks
Paper: Neenah, Bazzill, K&Company
Embellishments: Prima flowers, dollar store trim and pearls, American Crafts ribbon (for pens)
Tools: Spellbinders
Extras: Journal and pens from the dollar store