Wednesday, August 31, 2011

Friendship Rose

Hey folks! I've got a card to share with you today featuring one of the Fall Flora Fairies from the SCACD Stamp Co. These fairies can be  used for so many occasions. I think they are just perfect for cards for those sweet little girls in your life...after all, what little girl doesn't love fairies?!

So with that in mind, I set out to make a very "girly" card. I decided to ink up Friendship Rose and paired her up with some soft pastel papers from Prima. I lightly distressed all the paper edges and pulled out my sewing machine to add some stitching. The pretty crocheted trim is a dollar store find. I coated the petal edges of the little Prima rose in with Stardust Stickles. The pearls were made with a Viva Decor Pearl Pen in Ice White. The bow was made with my trusty Bow Easy. A few pearl sprays were tucked in behind the bow. The little tag was cut with Spellbinders and the sentiment is from Kraftin' Kimmie Stamps "Beachy Sentiments".


Friendship Rose was stamped on Neenah cardstock with Memento Tuxedo Black Ink and coloured with Copics. Her wings, shoes and green polkadots on her dress were coated with Stardust Stickles. Friendship Rose also comes with a pretty rose accessory stamp.

Skin: E000, E00, E11, R20  Hair: E50, E31, E33, E7, E59  Dress: B000, B91, B93, B95, B97, RV000, R81, R83, R85, R89, G20, G82, G85, G99, C7
The Fall Flora Fairies are avialble exclusively from SCACD and from Quixotic Paperie if you reside in the UK.

Make sure to check at SCACD frequently as Susana is always adding fantastic new product! Here's just a taste of what's been arriving over the last several days:
Thanks so much for stopping by today...I appreciate that you take the time out of your day to peek in at my blog. :)

Oh, and don't forget to enter for the SCACD Sylvia Zet Blog Candy at THIS POST!!! (it closes tomorrow at 10:00 pm EST so make sure to get your name in the draw!

Blessings,

Melanie

Stamps: SCACD "Friendship Rose" from the Fall Flora Fairies, sentiment from Kraftin' Kimmie Stamps
Ink: Memento, Copics
Paper: Bazzill, Neenah, Prima
Embellishments: Stickles, sewing, Viva Decor Pearl Pen, Pearl flower sprays, Prima rose, ribbon, crocheted trim
Tools: Spellbinders

Blog Candy Alert at SCACD!!!

Good morning to all my crafty friends out there!! I'm just popping on with a quick post to remind you of the current SCACD BLOG CANDY!!

If you haven't heard the amazing news yet, Susana is welcoming a new artist to the SCACD family...Sylvia Zet!! This adorable new release is scheduled for September 9th, 2011. SCACD design team member Elaine Hughes has already shared two gorgeous sneak peeks featuring just two of these soon to be released stamps...you are going to love the new Sylvia Zet for SCACD stamps!

To celebrate this upcoming release, Susana is offering some BLOG CANDY! If you have not yet entered, you had best RUSH over to THIS POST at the store blog to get your name in because the blog candy closes tomorrow at 10:00 pm EST. Good luck!!

I'll be back either later this evening or tomorrow morning with a new card featuring one of the recently released Fall Flora Fairies at SCACD...hope to see you then!

Blessings,

Melanie

Friday, August 26, 2011

The Fall Flora Fairies Collection at SCACD

Good morning friends! Are you ready for some SCACD excitement??

Today we're introducing you to a brand new set of adorable stamps from the SCACD Stamp Co. called "The Fall Flora Fairies Collection". There are four cute little fairies in this set and they are available exclusively at SCACD, and of course at Quixotic Paperie if you're in the UK.

Today I am sharing a card featuring one of these fairies. This is Annie Oak Leaf...she's so sweet in all her autumn glory! The papers are from Basic Grey Pyrus. I added a little swirl cut with my Spellbinders Doodle Parts, a few Viva Decor Pearls (Dark Brown), a scrap of ribbon and a couple of dollar store leafs. The "Autumn Blessings" sentiment is from Kraftin' Kimmie Stamps (Thankful Sentiments).


Annie Oak Leaf was stamped on Strathmore Bristol Smooth with Memento Ink and coloured with Copic markers. This was another experiment with a new paper...not super crazy about it to be honest. The ink doesn't blend very easily on this one, but thought I'd give it a whirl. (plus, a Michael's just opened up here last weekend and they had the paper pads on sale!) I'll try the paper again sometime soon, but I'm thinking it's going to be a new sketchpad instead. Her wings were given a coat of Stardust Stickles and the leaf she is holding was treated to a little Smooch Illuminate.

(my apologies, but I don't have a colour list this time)

For more inspiration featuring The Fall Flora Fairies Collection, please visit the SCACD Store Blog Follow Your Heart where you will find a list of links to the lovely design team members sharing projects today.

***SNEAK PEEK ALERT*** While you are visiting the Store Blog, make sure to check out the details of another sneak peek of our upcoming release featuring Sylvia Zet for SCACD...and a little birdie tells me there just may be some BLOG CANDY!!

Thanks so much for stopping by today and I  hope you all have a wonderful day. :)

Blessings,

Melanie

Sunday, August 21, 2011

Let's Brew Up Some Fun...Release Day at Kraftin' Kimmie Stamps!

Today's the day...the new August Halloween stamps are available for purchase at Kraftin' Kimmie Stamps! Over the last several days, you've seen the new stamps by Krafty Artists Cheryl Alger, Emilie Goulet and Annie Rodrigue...all three artist have created some fantastically creepy characters for this spooky release. We're celebrating the release with a blog hop today!

The hop begins over at the Kraftin' Kimmie Stamps Blog where you will find a complete list of all the talented designers participating in today's blog hop. As you hop along, please make sure to leave comments at each blog as Kimmie will be drawing some lucky winners who will win packages of some of the new August stamps! So, if you've been following along you should have arrived here after visiting with one of our newest Krafty Girls, the lovely Nicole! Wasn't her spooky project amazing...I love her style!!  (if not, just hop on over to the KKS Blog so you don't miss any stops along the way)

My card today features the spooky and slightly demented Potion Master by Annie Rodrigue. I love all the details of this stamp....the frazzled hair, the crazy eyes, the slightly hunched back...she's awesome! :)  Potion Master comes with two sentiments, "Let's Brew Up Some Fun!" and "We Have Chemistry!". The papers are from My Minds Eye "Haunted". The edges were all sponged with Black Soot Distress Ink. The bow was made with my Bow Easy. I added a little spider button and a tiny glass "potion" bottle that I filled with black glitter and  red glass beads. (The bottle was a dollar store find.)


Potion Master was stamped with Memento Tuxedo Black on Neenah cardstock and coloured with Copic makers. I tried to emphasize her crazy eyes by adding some deep red shading with my R59 (tip-to-tip blending method). I also wanted to give her a bit of a worn and "dirty" look, as I would imagine her laboratory is anything but pristine and sterile, so I added shading with my black Conte crayon. The image was masked and then the background was sponged with Antique Linen and Black Soot Distress Inks.


Skin: E000, E00, E11, R20, R59 Hair: E50, E31, E33, E37, E59  Goggles: R27, R46, R59, Y38, C1, C3, C5, C7 Coat: E41, E43, E47, E50  Pants: T2, B91, B93, B95, B97, B99, C5  Shirt: G94, C5  Beaker: B60, YG25, YG00, E13

After you are done hopping around, make sure to stop by the Kraftin' Kimmie Stamps Online Store because all the new August stamps are now available for purchase!! Back by popular demand are the Gimmie Kimmie Kits if you want to buy the stamps as complete sets...the kits are always offered at an amazing discounted price, so make sure to scoop yours up before they disappear!

It's now my pleasure to send you off to visit with the always sweet and very talented Diana...just wait until you see what spooky fun she's been brewing up for you! Oh, and don't forget to leave comments along the hop for your chance to win some of the new stamps!

Thanks for joining us on the blog hop today!

Blessings,

Melanie

Stamps: Kraftin' Kimmie Stamps "Potion Master" and coordinating sentiment
Paper: Neenah, Bazzill, MME
Ink: Memento, Copics, Distress Inks
Embellishments: Ribbon, spider button, glass bottle, glass beads, Martha Stewart Glitter

Saturday, August 20, 2011

Make It Spooky at Kraftin' Kimmie Stamps

Could we possibly squeeze any more fun into one day at the Kraftin' Kimmie Stamps Blog??!! We have our weekly challenge, another round of August sneak peeks and bog candy!! For today's challenge all the Krafty Girls have made projects featuring the August stamps by Krafty artist Annie Rodrigue...just wait until you see what she has been brewing up for your colouring pleasure!!

Our challenge this week is "Make It Spooky", so look into your crafty treasure troves and pull out all things ghoulish and creepy and get Krafty with us.

This brand new little spell caster by artist Annie Rodrigue is "Magical Mathilda". (she comes with two sentiments: "Come and sit for a spell!" and "Bugs and hisses to you!") That's quite the book she's got there, no?...not sure what magic she's released by opening the cover, but she is quite enthralled with that wispy trail of spooky skulls! It kind of reminds me of the books in Harry Potter. (Remember the Monster Book of Monsters? Or how about that creepy one from the restricted section in the Hogwarts library...the one that lets out that spine-tingling screech when opened??) I have a little story about this card. You see, months ago I had coloured up a Halloween image and created this card base for it. I sat it on my shelf and looked at it for two days...and hated it. The colours were just "off"...so I very carefully used a piece of thread to tease the image off, and created another card base with papers that matched that coloured image better. I was not about to throw this one out though, so I stuck it in a file for future use. When I set about colouring up images for this month's release, I pulled out this card to see if it suited any of them, and thought Mathlida would look cute perched on the circular layer. I just made sure to colour my image to actually MATCH my papers this time, lol. However, I still should have coloured the "magic spell" darker...it's a bit too bright for this card still. Anyways, the point of my story is never throw away your "failed" cards or even bits and pieces of cards...you never know when they will come in handy! I can't quite remember for sure, but I believe the papers are from Basic Grey Wassail (yeah I know, Christmas papers on a Halloween card?!) and some MME paper that was heavily inked with Distress Inks to coordinate with the colour scheme (probably Bundled Sage and Black Soot Distress Inks). The ribbon is Offray from Walmart and the little brad was one I had in my stash. Circle and Lacey Circle Spellbinders were used for the circular panel. It was embellished with flat backed rhinestones (from Walmart) that were coloured with a C9 Copic marker.


Magical Mathilda was stamped on Neenah cardstock with Memento Ink and coloured with Copic markers. As I said earlier, I should have coloured the "spell" darker...I used several markers on it, but perhaps the C's should have been a little more dominant. I did use some black Conte crayon afterwards to try to make it appear "smokier", but I also applied a bit of Smooch Illuminate which may have decreased the effect. While I wanted the pumpkins to be orange, I still wanted them to have a "ghostly" feel since they are part of Mathilda's spell so I first coloured them in a base of BV23 and BV31. That was followed by some E97, E99, a bit of C5 for shadows along the left edge and a bit of RV000 for the highlights on the right edges. I think next time I'll try to colour them a bit more "transparent" so that you can see the wisps of smoke through them. I adhered Mathilda directly to the paper with my favourite adhesive Tombow Multi Liquid Glue, but I popped up the "spell" with foam squares for a bit of dimension.


Skin: E000, E00, E11, R20  Hair: E50, E31, E33, E37, E59  Dress: R27, R46, R59, C5, C7, YG00, G20, G24, YG91, YG95, G99, C5 (and a bit of black Conte Crayon to deepen the shadows) Tights: E41, E43, E47, E50 (and black Conte Crayon) Book: E25, Y23, Y17, E31, (first coloured with a base of BV31 before applying red) R27, R46, R59, C5, C7, black Conte Crayon  Spell: BV00, BV23, BV31, RV000, C00, C1, C5  **NOTE** if you plan to use Conte Crayons for additional shading, please make sure to do so after you have completely finished with your markers so as not to contaminate your marker nibs. :)

We'd love to have you play along with our Make It Spooky challenge. Our random winner this week will receive their choice of one of the brand new August stamps!! (just make sure to use a Kraftin' Kimmie Stamp on your project to be eligible) The new stamps used by the Krafty Girls today will be available for purchase tomorrow, but in the meantime you can use any of last year's amazing Halloween release to play along with the challenge!! (I loved last year's Halloween release as well...so many fantastically creepy characters! you can find them all at the Kraftin' Kimmie Stamps Online Store) For more creepy inspiration and sneak peeks of Annie's newest Kraftin' Kimmie stamps, please make sure to visit with the rest of the Krafty Girls today...links to their blogs can be found at the Kraftin' Kimmie Stamps Blog.

***SNEAK PEEK BLOG CANDY ALERT***:  Would you like to win some of the newest Annie Rodrigue Kraftin' Kimmie Stamps??!! Well, make sure leave comments for each of the Krafty Girls participating in today's sneak peeks, and Kimmie will draw TWO winners who will each win THREE of the new stamps!! Their names will be announced on tomorrow's post at the Kraftin' Kimmie Stamps Blog.

One more sleep my friends, and then you can get your inky fingers on the new August stamps!! Please join us tomorrow for the release day blog hop. You will have the opportunity to see a variety of the new stamps in amazing projects by a fantastic group of very talented paper crafters sure to spark your creative juices...and then you can do some Krafty shopping!

Blessing,

Melanie

Stamps: Kraftin' Kimmie Stamps "Magical Mathilda"
Ink: Memento, Copics, Distress Ink
Paper: Neenah, Bazzill, MME, Basic Grey
Embellishments: Ribbon, machine stitching, rhinestones and brad
Tools: Spellbinders

Friday, August 19, 2011

I Will Hug Him and Pet Him and Call Him George!....more Kraftin' Kimmie Sneak Peeks!

LOL...have you ever set eyes on a stamp and had a quote from a cartoon or movie pop into your head?? Well, that's exactly what happened as soon as I saw "Frank 'n Kitty", a brand new Kraftin' Kimmie Stamp by Krafty Artist Emilie Goulet that is will be released this Sunday! I took one look at Frank 'n Kitty and remembered the Loony Toons Abominable Snowman cuddling poor Daffy (who he thought was a bunny) and saying "I will name him George and I will hug him and pet him and squeeze him." (If you have absolutely  NO idea what I'm talking about and think I'm a bit of a Loony Toon myself...which is arguably true some days, lol...I'll have a link at the bottom of the post to a little snippet of classic Loony Toons fun! But, not until after you see the new STAMP first!)

So without further ado...meet "Frank 'n Kitty"! This stamp is hilarious, and yet another shining example of Emilie's talent for creating such personality in her characters. The papers are from Echo Park. I added a bit of faux stitching with a ruler and a Copic multiliner. The "Trick or Treat" sentiment I used is from the Halloween Sentiments set, which just happens to be a perfect compliment to this year's Halloween release!


Frank is looking quite enthralled with his new pet...the cat (or "George" lol) on the other hand, not so much! As a matter of fact, I've seldom seen a cat look that, errr, let's just say perturbed. :) The image was stamped with Memento Ink on Neenah cardstock and coloured with Copic markers. The background was sponged with Bundled Sage and Black Soot Distress Inks.


Frank
Skin: YG00, G20, G21, G82, G85, G99, C5  Hair: C3, C5, C7, C9, 100 Pants: BG0000, B91, B93, B95, B97, C3, C5  Shirt: Y17, Y23, YR16, E13, E17, E18, E59 Shoes: R22, R27, R46, R59, C5, E50, E41, E43, W00, E50, E31, E25, E29, E59  Ground: W1, W3, W5
Kitty: E50, E41, W00, W1, W3, W5, W7, W9

SNEAK PEEK BLOG CANDY ALERT: To see the rest of the sneak peeks for today, please visit the Kraftin' Kimmie Stamps Blog. While you're hopping around, make sure to leave comments for all the Krafty Girls as Kimmie will be drawing one lucky winner who will receive a complete set of Emilie's August stamps!! The winner will be announced on the KKS Blog in tomorrow's post. :)

Ok, as promised at the top of my post here is the LINK to the Loony Toons video snippet. Now tell me that this stamp doesn't remind you of this pair!!! It makes me giggle...and I think we all need a little giggle from time to time. :)

Thanks so much for stopping by today, and I hope you plan to join us tomorrow for our weekly challenge and another round of sneak peeks!

Blessings,

Melanie

Stamps: Kraftin' Kimmie Stamps "Frank 'n Kitty"
Ink: Memento, Copics, Distress Inks
Paper: Neenah, Bazzill, Echo Park

Thursday, August 18, 2011

Bubble Bubble Toil and Trouble...Kraftin' Kimmie Sneak Peeks Start Today!!

It's almost time for another fantastic release at Kraftin' Kimmie Stamps...and we're gettin' our Spook on for August! That's right, all the stamps in this month's release are Halloween themed!  Each day leading up to the release this Sunday, the Krafty Girls will be showcasing stamps by different Krafty Artists..tune in to the Kraftin' Kimmie Stamps Blog each day for links to the participating Krafty Girls' blogs. On Sunday, we'll celebrate release day with a ghoulish blog hop certain to offer loads of spooky inspiration as you'll see a collection of cards featuring an assortment of the August stamps.

Today, we are introducing a trio of whimsical little witches by Krafty artist Cheryl Alger! This is "You're Boo-tiful" who comes with the sentiment matching her name. This little witch was a lot of fun to colour up with her cute hat and curly hair. I went with traditional Halloween colours to match the paper from Echo Park. One of these double sided Echo Park sheets had a bunch of tags and little sentiments on one side..I used two of them to frame the witch and for the sentiment. The sentiment was stamped with black Versafine Ink. I also used Bundled Sage and Black Soot Distress Inks on the paper edges. The little black "stitches" were added with a Copic multiliner.


"You're Boo-tiful" was stamped on Neenah cardstock with Memento ink and coloured with Copics.


Skin: E000, E00, E11, R20  Hair: E50, E31, E33, E7, E59  Clothing: C3, C5, C7, C9, V01, V04, V06, V09, YG00, G20, G21, YG67  Pumpkin: (I didn't write these down, so I'm working from memory...and I really fiddled around with a bunch of colours as I wasn't happy with it, so I'm pretty sure this is not an accurate or complete list. Sorry!) Y06, Y23, YR04, YR07, E08, E18

Please hop on over to the Kraftin' Kimmie Stamps Blog to see what my fellow Krafty Girls have been brewing up in their craft rooms...pure magic I tell you!!

BLOG CANDY!!! How would you like to win yourself the complete set of all three witches by Cheryl Alger?? All you need to do is leave a comment at the blogs of all Krafty Girls participating in today's sneak peeks and Kimmie will draw one lucky winner who will be announced tomorrow! Remember, links to all sneak peeks can be found on the Kraftin' Kimmie Stamps Blog which is also where you will find the winner's name posted the following day. Good luck!

We hope to see you back tomorrow for another round of spooky sneak peeks featuring stamps by yet another Krafty Artist!

Blessings,

Melanie

Stamps: Kraftin' Kimmie Stamps "You're Boo-tiful" and sentiment
Paper: Neenah, Bazzill, Echo Park
Ink: Memento, Versafine, Copics, Distress Inks, Copic multiliner

Wednesday, August 17, 2011

Jackpot!

Good morning to all my crafty friends! I've got another "Peeker" card to share with you today. :) For anybody who may not be familiar with "The Peekers", they are a collection of adorable little girls designed exclusively for SCACD by artist Elisabeth Bell. Susana recently released the second installment of these lovely little tykes, "The Peekers Collection 2".

This is "Mama's Purse Peeker". I just love her...actually the entire Peeker collection has made its way into my heart. :) They are so much fun to colour up. This wee lass has hit the jackpot though...just look at that happy grin and little fist full of dollars! I remember as a little girl thinking what a treasure trove my mom's purse was...gum, hairbrushes, compacts, chapstick and of course money! lol The papers are from My Mind's Eye Stella and Rose. (check out Susana's amazing selection of paper HERE) The flower is from Prima (De Soie). The swirls were made with Spellbinders Doodle Parts. (SCACD's selection of Spellbinders can be found HERE.)


I stamped "Mama's Purse Peeker" on Make It Colourful cardstock  in Memento Tuxedo Black Ink and coloured with Copics. The purse was paper pieced with some of the MME patterned paper, but shading was added with Copic markers before adhering it to the image. Oh...and I just noticed now that I splotched a bit of yellow from the purse handle right in the middle of the purse. sigh. So, please feel free to take a closer look...just not there, lol.


Skin: E000, E00, E11, R20 Hair: Dress and Headband: YR00, YR04, YR20, YR23, Y38, E08, E18 Flower and Dots on Headband: RV000, R20, R22, R59, BG72, BG75, C5 Shading on Paper-pieced Purse: BG000, BG10, BG72, BG75, C5, C7 Money: YG00, G20, G21, C5, C7

The Peekers Collection 2 is exclusively available at SCACD and at Quixotic Paperie if you live over in the UK. Make sure to check in at SCACD frequently as Susana is always adding new products!

If you have not yet signed up as a follower over at the SCACD store blog Follow Your Heart, please make sure to do so! There is always inspiration to be found there by the very talented design team featuring stamps and products carried at SCACD.

I hope you enjoy the rest of your day and thanks so much for stopping by. :)

Blessings,

Melanie

Stamps: SCACD's "Mama's Purse Peeker" from The Peekers Collection 2"
Ink: Memento, Copics
Paper: Bazzill, Make It Colourful blending card, MME
Embellishments: Prima flower, ribbon, pearls
Tools:Spellbinders Doodle Parts

Sunday, August 14, 2011

The Big "Reveal" at SCACD!!

By now I assume you've all heard the BIG news at SCACD?! Susana is welcoming another artist who will be designing exclusive stamps for SCACD! Over the last few days, we've been showing you puzzle pieces of a sneak peek of one of the new stamps that will soon be released. I bet you've all been intrigued! Well, the wait is over as today we will reveal the entire sneak peek! You are going to love this new image...to see it, please visit the SCACD store blog Follow Your Heart!

While you are there, you can read full details on who this amazing new artist is!

Susana will also have a new blinkie you can grab for your blog to announce this upcoming release...the code will be on the Store Blog! So what are you waiting for? Get on over to Follow Your Heart to see this adorable new image!!

Blessings,

Melanie

Saturday, August 13, 2011

A Kraftin' Kimmie Recipe Challenge!

Hello to all my lovely crafty friends! I hope you have all had a wonderful week. Last weekend, my husband and I enjoyed a little weekend getaway to Stratford, Ontario. We had the opportunity to take in the musical "Camelot" at the Festival Theatre...it was fantastic! We also enjoyed strolling along the streets, visiting various little shops and spending an hour out on the Avon river feeding the swans and ducks from a paddle boat. It was wonderful, and we are hoping to return to Stratford again soon.

We have another fun challenge today over at the Kraftin' Kimmie Stamps Blog. The very talented Miss Tracy Cornhill is our hostess today...she's come up with a great Recipe Challenge: 1 Flower, 1 Ribbon and 1 Piece of Chipboard. So pull out those embellishment bins and let's get Krafty!

This week, I was in need of a special birthday card for my best friend Amanda. Our birthdays are only five days apart, so we always find a fun way to celebrate together. We are going to head to London tomorrow to go for lunch and enjoy a little shopping, during which she will get to use part of the gift I gave her...a Sephora gift card. :) Amanda is an esthetician, so I thought Sephora might be right up her alley!
As I sat and thought about which Kraftin' Kimmie Stamp to use for Amanda's card, I realized there was one stamp PERFECT for a Sephora gift card..."Samantha"! I mean seriously, could you get any more glamorous??!! Perfectly styled hair, lipstick and a compact...and a cute little figure that I dream of having one day! lol This stamp was made for all those ladies who love a little glamour in their lives. (and we all deserve that from time to time!) The papers are Bo Bunny Gabrielle, the edges of which were lightly distressed and sponged with Walnut Stain Distress Ink. To follow Tracy's recipe I used a glittery Prima rose, a bit of ribbon from my bin and a piece of Make It Crafty Laser Cut Chipboard. I love this chipboard...but unfortunately I didn't position it very well, as most of it is hidden under the flower. I treated it with a coat of white craft paint and then sponged it with Oasis Green Chalk Ink , Aspen Mist Chalk Ink and Walnut Stain Distress Ink. I added some pearls even though they were not part of Tracy's recipe...my card was just looking a little too bare.


Samantha was stamped on Make It Colourful blending card  with Memento Ink and coloured with Copic markers. (I'm experimenting with a few different papers for colouring...a lovely friend sent me a couple of sheets to play around with.) I also tried out a new technique that the lovely and phenomenally talented Zoe has been inspiring everybody to try over on the Make It Crafty group on Facebook...using a pale ink to stamp your image to eliminate the harsh black outlines. I had actually tried this out with some grey ink a month or so ago, but the results were NOT fantastic. lol The image promptly made it into my scrap bin...the grey ink had too much of a green undertone. I just went back to using my black ink...until I saw Zoe and the other talented ladies over on the facebook group posting some gorgeous images without black lines! Well, me being too impatient to wait for my local store to be open to get a new inkpad, decided to give it another whirl with the only other pale Copic-compatible inkpad I had...Memento Summer Sky. Ok, so it's probably not the best ink colour to use for this technique, but it's not horrible either...you just need to build up your shading enough to conceal the blue lines. I'm planning to pick up a couple of other ink colours being recommended by the gals on the group as their results have been beautiful. Anyways, this is a fantastic technique to really work on your shading skills! You see, when you remove those harsh black lines you MUST rely on your highlights and shadows to define the edges of your images. The same rules of course apply...begin by identifying your light source so you know where the shadows will fall. Then just go to town with your choice of colouring medium! I absolutely love the effect...I find it to be quite a sophisticated look, almost like a painting. I remember my  high school art teacher discouraging us from using harsh outlines...unless of course, we were actually working on a cartoon or comic book type piece. He wanted us to create the dimension in our sketches and paintings by developing our skills in shading. He was such a fantastic teacher, and I always looked forward to his classes. Here's a closer look...to be honest, I needed to develop the depth on her clothes a bit more. I did use my Copic multiliner on her lashline. After all, a gal needs a good coat of mascara when she's getting ready to hit the town! Her lower lash line was just defined with E11.


Skin: E000, E00, E11, R20 Hair: E50, Y23, E31, E33, E37, E59 Clothes: BG10, BG11, BG72, BG75, C5, C7 Compact: C1, C3, C5, C7

Hop on over to the Kraftin' Kimmie Stamps Blog to see what the rest of the Krafty Girls have created for the recipe challenge...if you participate and use a Kraftin' Kimmie Stamp, you could be the lucky winner of the stamp Tracy used on her card this week!

Have you seen the big make-over at the Kraftin' Kimmie Stamps Online Store and Blog??!! Kimmie has been hard at work creating a gorgeous new look...you are going to love the changes!! The store is now even easier to navigate, and so much fun to visit! While you are taking a peek around, check out the Frugal Fridays sales this week....you'll find them HERE.

Have a wonderful week friends! Oh, and in case you're interested the sneak peeks begin next week for the August release!! (you are going to LOVE the new stamps, so stay tuned!)

Blessings,

Melanie


Stamps: Kraftin' Kimmie Stamps "Samantha"
Ink: Memento Summer Sky, Chalk Inks, Distress Ink and Copics
Paper: Bo Bunny Gabrielle, Neenah, Bazzill
Embellishments: Prima flower, ribbon, pearls, Make it Crafty chipboard

Friday, August 12, 2011

Did You Hear the Big News??!!

Did you see the big announcment the other day on the SCACD store blog Follow Your Heart? Susana is introducing a brand new artist to the SCACD exclusive stamp lines! We revealed a couple of small puzzle pieces of a sneak peak of one the new stamps, and today we're adding a few more! All I'm going to say is that you will LOVE this artist and her images! Pop on over to the store blog for more details on who the artist is and some blog candy that Susana is offering! 


scacd_august2011_preview2_Aug12

Have a wonderful day!

Blessings,

Melanie

Thursday, August 11, 2011

Tinkering...

Hey folks...just wanted you to know that I'm tinkering around with my blog a little bit. I noticed tonight that things seemed out of alignment. Different elements were running into each other. Now, I am far from being technologically savvy, so I am asking for your patience while I try to figure things out! I kind of fall at the other end of the spectrum, otherwise know as technologically challenged. lol  At first, I thought it had something to do with the background I was using, but that doesn't seem to be the case. sigh. Figures it wouldn't be that easy of a fix!

I can't quite seem to figure out the templates, which is frustrating me! I have tried using several of the "newer" ones and they all seem to want to put my page elements in one column. All of my sidebar gadgets are being put under the posts...even when I am choosing the layouts that clearly show separate columns for my gadgets. I've tried the "older" layouts as well, and this one seems to be the only one that is working properly for me. It's pretty clean and simple...but I think I kind of like it this way!

If anybody should happen to have some words of wisdom to share, I'd definitely appreciate it! I get a little nervous playing around with things, as I don't want to do something catastrophic like wiping my whole blog clean! yikes...that would be BAD!

That's it for me tonight! I had hoped to get some colouring done after watching So You Think You Can Dance with my daughter Ainsleigh...oh my goodness this season has been amazing, and the finale is tomorrow!! But instead of colouring, I ended up sitting on the computer fiddling around with layouts...so for now, I'm just going to leave my blog as is. I have several projects to get done over the next few days, so I think my time might be better spent with markers in hand! lol

Hope you all have a wonderful night!

Blessings,

Melanie

Wednesday, August 10, 2011

Psst....Something Exciting is Coming to SCACD!!!

Please join us at the SCACD Store Blog to Welcome the Newest Artist to SCACD!!!

There is also a chance to win something but you will have to go to the Store Blog to check it all out :o) We are all very excited about this addition and look forward to the upcoming release next month!!!

So what are you waiting for?? Head on over and check it out!!!

Blessings,

Melanie

Saturday, August 6, 2011

Feeling a Little "Distressed"?

Good morning folks!! We have some happy news to share with you at Kraftin' Kimmie Stamps...we have two lovely new ladies joining us as permanent Krafty Girls!! Please join us in welcoming Nicole Aspinall and Pam Varnell! We are so excited to have both of you joining our Krafty family and we look forward to seeing the creativity you bring to the team. :)

Well, it's time for another Kraftin' Kimmie Challenge, and today it's my turn to play hostess! I would like to see you use one of my favourite techniques: "Distressing". You can feel free to distress your papers however you like...Distress Ink, tearing, crumpling, distressing tools, scissor edges...whatever suits your fancy. :) So go ahead and take a little of your stress out on your paper...it's therapeutic!

Oh, and Kraftin' Kimmie Stamps is sponsoring the Sketch For You To Try challenge this month!!! Jen Del Muro has yet another fabulous sketch for you to play along with, and she will be giving a sweet Kraftin' Kimmie prize to one lucky participant from the SFYTT challenge blog at the end of the month. I do love a good sketch...they make the assembly process much easier for layout-challenged stampers like me! lol I've used her great sketch on my Kraftin' Kimmie Challenge card today.

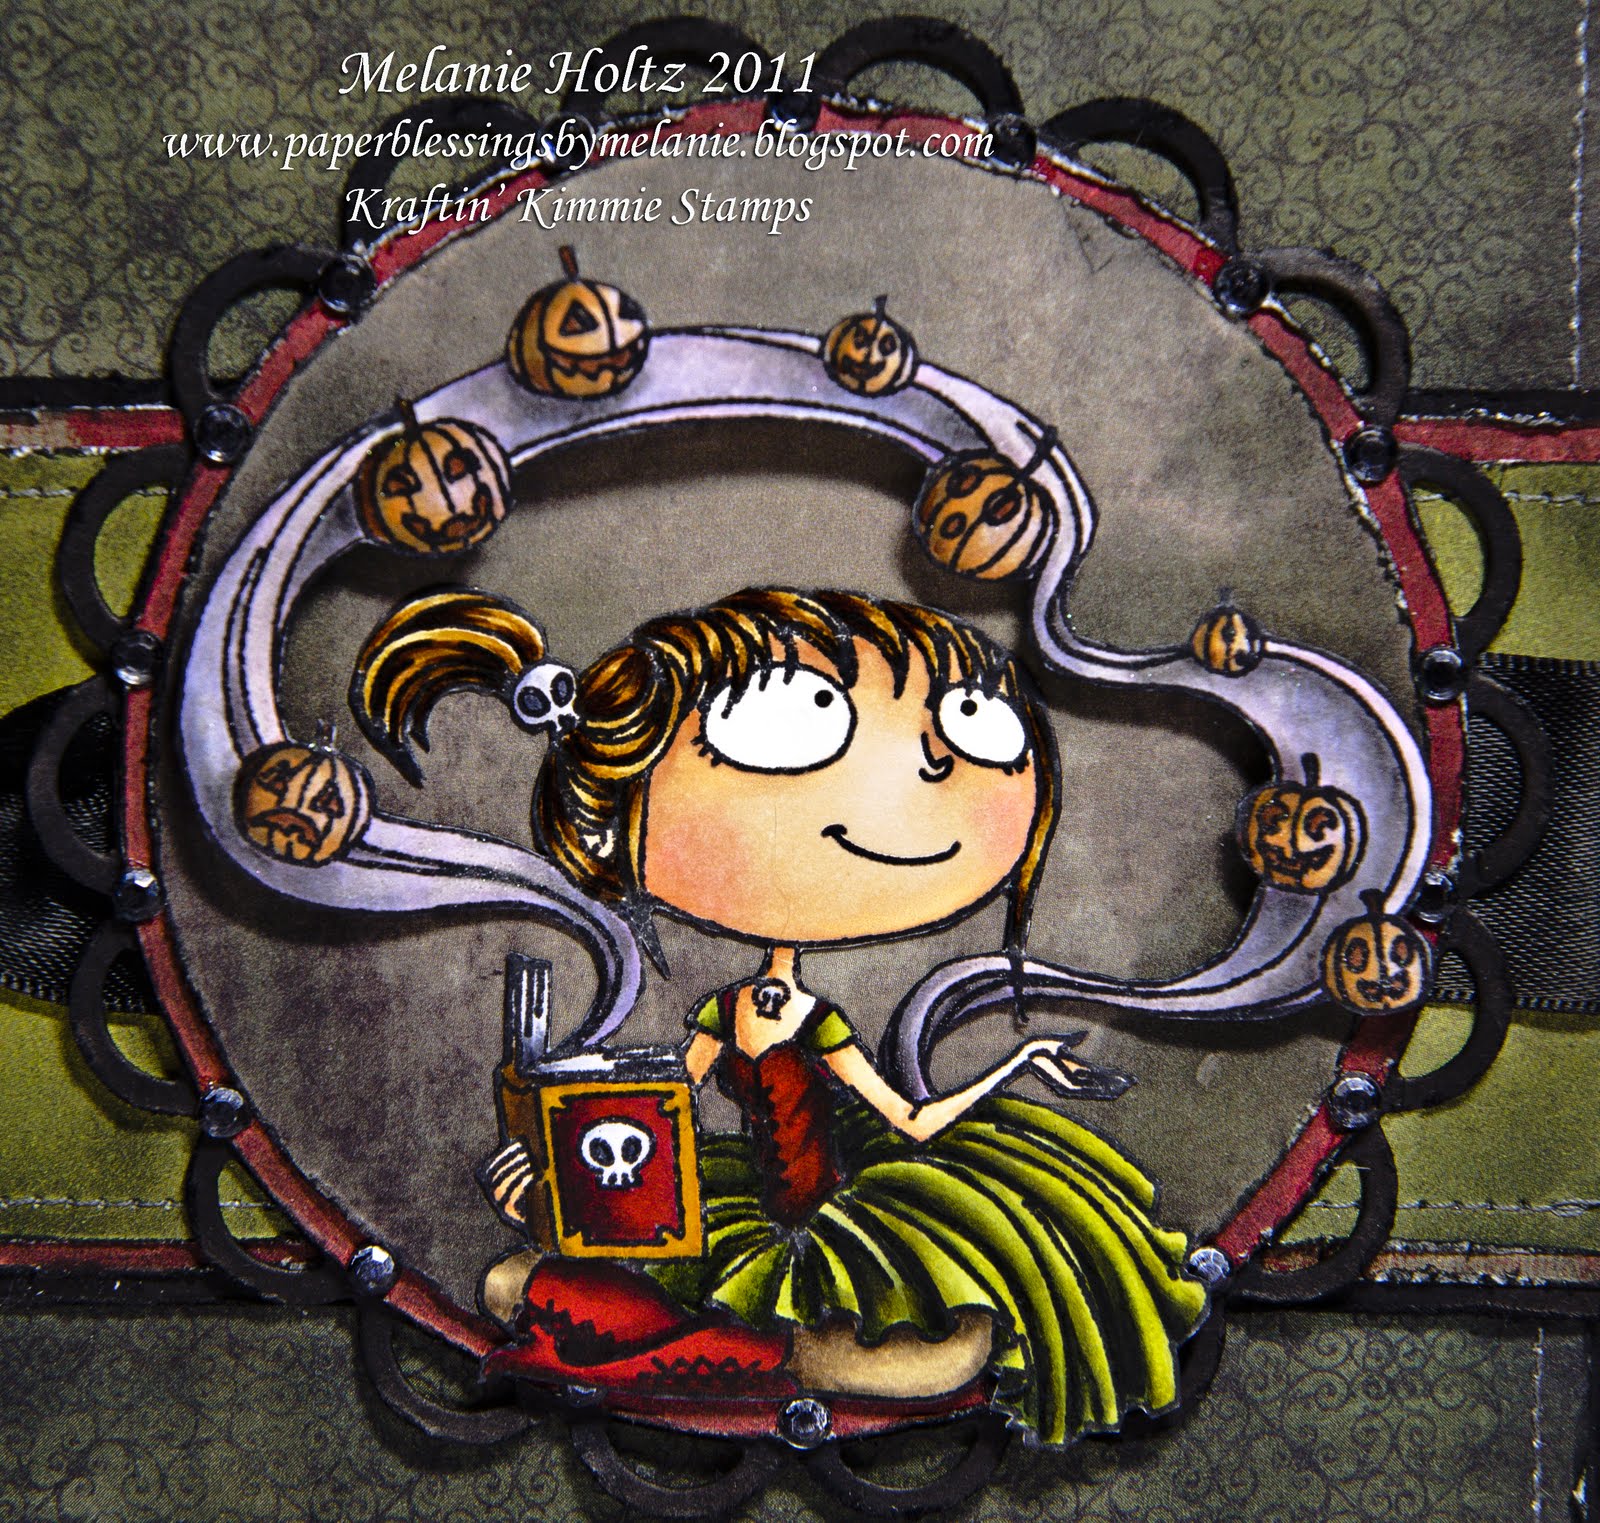
I'm sure you all have your favourite genre of stamps...I am a total "sucker" (pun definitely intended!!) for Halloween stamps...well, and Christmas stamps too!! I am always drawn to Halloween and Christmas papers, no matter what time of year it is! I decided to pull out one of last year's Kraftin' Kimmie Halloween stamps...this is fanged gent and his lady love are "Fred and Ginger". The striped paper is from Graphic 45. The other design papers are all from We R Memory Keepers "Heebiejeebies"....love that name!! I heavily distressed the edges with some dull scissors and sponged them with Black Soot Distress Ink. The "Love Bites" sentiment comes with Fred and Ginger...it was stamped in Versafine Ink on white cardstock that was sponged with Antique Linen and Black Soot Distress Inks.


One of the things I love about Halloween stamps is that they give you the opportunity to play around with different skin colour combos and shading techniques. Let's face it...not very many ghoulish characters have that lovely glowing complexion that we all strive to achieve with most of our colouring projects! Nope...vampires, witches, zombies and ghosts just cry out for deep, purple shadows...green skin may even be in order on occasion. Last year, I did a card with "Fred and Ginger" and I coloured Fred's face a la "old school vampires"...his face was chalky white with deep shadows around his eyes. This time, I chose to experiment a little with flesh tones and some purple shading. To be honest, it didn't come out quite as dramatic as I had hoped...but it's all a learning process. :) I try to take notes on what works and what doesn't so that next time I can hopefully apply what I've learned and come up with a better result. I did find that I needed to use a lot of tip-to-tip blending to work in those purples so that I ended up with a smoother blend. Sometimes certain colours will not blend seamlessly when applied directly to your paper, but if you touch your marker tips and combine the colours like that, it helps with the transitional areas. After I was done with my Copics, I used my Conte crayons and a blending stump to add additional shading. I was a bit heavy handed with the application of these shadows so I used a kneaded eraser to lift a bit of the Conte crayon after I was done blending. I really wanted to play up the difference in complexion between the living and the dead with Ginger. I applied the "blush" quite a bit heavier than I normally would to try to maximize the contrast of skin with blood still circulating through it. lol I think this pair is so much fun. Ginger is definitely swooning...but take a look at those puckered lips! I'm thinking she may enjoy flirting with danger just a wee bit. ;)


Fred: Skin: E0000, E000, BV00, V91, C00, T2 (additional shading with a black Conte Crayon in 2B) Cape: C3, C5, C7, C9, 100 Shirt: G82, C5 Tie: R27, R59, C5
Ginger: Skin: E000, E00, E11, R20 Hair: E50, E30, E31, E33, E37, E59 Dress: RV000, V00, V01, V12, V15, V09, C5, C7

We'd love to have you play along with the "Distressing" challenge. If you do, you could be the lucky winner of "Fred and Ginger"...just make sure you use a Kraftin' Kimmie Stamp on your project to be eligible for the prize. If you are in the need of some new stamps, you can go shopping at the Kraftin' Kimmie Stamps Online Store. Don't forget that you can double your chances of winning some Kraftin' Kimmie goodness by also entering the SFYTT challenge this month!

Don't forget to hop on over to the Kraftin' Kimmie Stamps Blog to see the gorgeous distressed projects by the rest of the talented Krafty Girls!

Oh...and did you check out the "Frugal Friday" sales for this week yet? Each week Kimmie chooses a few stamps to put on sale at amazing discounts! Here are the stamps on sale this week (all at 40-50% off!): Tickled Pink Piggies, Krafty Quotes #2, Fireman Phil, Agnes, Snowshoe Fun and Private Message!! (just click on the above link to go directly to the Frugal Fridays Specials!)

Thanks so much for stopping by today...I truly appreciate your visit. :)

Blessings,

Melanie

Stamps: Kraftin' Kimmie Stamps "Fred and Ginger"
Ink: Memento, Copics, Distress Ink
Paper: Neenah, Bazzill,WRMK, Graphic 45

Friday, August 5, 2011

Sweet Cheeks :)

Good afternoon! I've got a card to share with you today featuring one of the brand new stamps from The Peekers Collection 2 which is now available for purchase exclusively at SCACD and at Quixotic Paperie for our UK friends. This adorable little girl is appropriately named "Sweet Cheeks Peeker". This is the age that a little "cheek" is still seen as cute...not so much when we're talking about teenagers or adults. :S lol I just adore artist Elisabeth Bell's style and she has done such a fabulous job on this new set of Peekers.

I decided to make a shaped card using my circle Spellbinders as a base. I then cut an additional panel with Spellbinders Lacey Circles to adhere to the front of the card. I used two sheets of design paper from a fantastic SEI pack called A Fair Day. This paper collection features soft pastel designs and some of the papers have a beautiful shimmer...and it's on sale right now for 20% off! (You can check out Susana's entire selection of 6x6 paper pads HERE.) As much as I love to add machine stitching to my cards, I cannot sew around circles...it always turns into a big mess. :( My solution-hand stitching. Yes it is more time consuming, but it's much easier to work around tricky curves and shapes. Before stitching, I left my paper in the Spellbinders die and used a paper piercing tool to make the holes. (I used my Sew Easy foam mat to protect my table.) This helps to keep your stitching in line, but you could always free hand it if you prefer. I didn't worry about the holes being perfectly spaced as I think it kind of adds to the charm of hand stitching. I used white floss and went around the paper with a simple back stitch. I used to do a ton of cross stitching years ago, so I have quite a stash of embroidery floss. However, if you are in the need of some floss, Susana has a wonderful selection of Sew Easy Floss...the colours are fabulous, and they are currently on sale for 20% off! (I absolutely love the bakers twine.) The flower is a Prima Hydrangea (you can find these flowers in Tan and Purple HERE). The button, ribbon and crocheted trim are odds and ends I found in my embellishment bins...although, now I am wishing I had fished around for a green button instead just to tie in with the green skirt and stripe in the paper.


Sweet Cheeks Peeker was stamped on Neenah cardstock with Memento Tuxedo Black Ink and coloured with Copic makers. She was adhered with some foam squares for a bit of dimension.

Colours: Skin: E000, E00, E11, R20 Hair: E50, E30, E31, E33, E37, E59 Clothing: RV000, R81, R83, R85, R89, YG00, G20, G21, G28, C5, C7

The Peekers Collection 2 is now available at SCACD (and at Quixotic Paperie). Oh, and have you seen the newest products to arrive at SCACD??

  • Authentique 6x6 paper pads (just wait until you see the Halloween pack!!)

  • New Holiday 6x6 paper pads (Bo Bunny, Authentique)

  • Holiday Bo Bunny Trinkets

  • No More Shims Embossing Mat from Scor Pal

  • New Winter Gorjuss Girls are now in stock!!


  • Oh, and sit down for this one folks...ready for it???

    18 NEW 6x6 PAPER COLLECTIONS FROM MY MIND'S EYE!!!

    So after hearing that news, I promptly asked Susana how large her shipping boxes are, lol. She has assured me that she has packages large enough to accommodate all your crafty wishes...so order away my friends!! Honestly, her pricing on 6x6 paper pads is amazing...just make sure to leave a few in stock for me, ok? ;)

    Have a wonderful day...and thanks so much for taking the time to stop by for a visit!

    Blessings,

    Melanie

    Stamps: SCACD's The Peeker Collection 2: "Sweet Cheeks Peeker"
    Paper: Neenah, Bazzill, SEI
    Ink: Memento, Copics
    Embellishments: embroidery floss, crocheted trim, ribbon, button
    Tools: Spellbinders, Scor Pal, piercing tool, Sew Easy mat