Good morning friends! I hope you all had a wonderful Christmas. We has a busy few days with family dinners...but it was the good kind of busy. :) Lots of food, fellowship and fun! My cousins, my son Nathan and I sat down to play a game of Scribblish last night. Oh my goodness, I haven't laughed that hard in a long time. You all know the game "Telephone" right? Well Scribblish is basically the same game, but it's done with sketches. You each start out with a caption that you write down and then draw a picture for...then you randomly pass it around, and the next person unrolls just the drawing and has to come up with a new caption...then you pass it to another player who views only the new caption and creates a new drawing to represent it...this process repeats several times. Finally, everybody lays their scrolls in the centre of the table with only the final drawing showing...then you need to guess which one belongs to your original caption. We had a blast, and we're planning a rematch soon!
Today, I have nothing on my agenda. I can't even remember the last time I was able to say that! Our fridge is full of leftover ham, roast beef, veggies, mashed potatoes, homemade bread and pumpkin pie. No cooking for me tonight! So...I am going to colour today. I have some brand new stamps to ink up, and I am craving some crafty time, as I've had next to none over the past month.
On that crafty note, I wanted to let you know about the Kraftin' Kimmie Stamps Online Store Boxing Week Sale!!! Trust me, you do not want to miss out on this amazing event. Here's the details:
From Dec. 26th-31st most of our inventory is 20 to 50% off!!This is our BIGGEST sale of the year!!
The store will be closed from December 23rd to December 27th and again from December 30th to January 4th. You are free to place orders during these times and they will be shipped out as soon as we are back in the office!!
So, hop on over to the Online Store to take advantage of Kimmie's sale...time's a tickin'!! Oh, and you still have time to convince those Krafty Dudes in your life to help you participate in the current challenge on the Kraftin' Kimmie Stamps Challenge Blog! We will be back with the first challenge of the new year on January 8, 2011 so make sure to stay tuned
Enjoy your day folks!
Blessings,
Melanie
Monday, December 27, 2010
Wednesday, December 22, 2010
Mistletoe Mischief!
Good morning friends! I cannot believe that it's already December 22...this time of year just flies by so quickly. I trust that all your holiday preparations are complete? On Christmas day, we'll be having dinner with my in-laws and we're hosting a boxing day dinner at our house for my side of the family. At my hubby's request, roast beef will be on the menu...and perhaps some spiral ham, which is more to my liking! My cousin always requests pumpkin pie...one of his own, and one for everybody else to share, lol. Following dinner, we'll be breaking out the games!! I LOVE playing games, and this year I was finally able to find Balderdash!! I've been looking for this game for years, and this was the first time I've been able to find it...although I think they've redone it, so I'm curious to see how it differs. We've also picked up Scribblish, which I'm looking forward to trying out.
Today is my turn to post over at Sundays With Crissy. This month, Crissy is giving us the choice of two challenge topics...Christmas is Coming or Winter is Here!! I thought I would sneak in one final Christmas Card this year. I chose to work with one of Crissy's images that she drew for Wags 'n Whiskers Stamps...this is "Steal a Kiss". I adore this cute image, and have been waiting for a chance to use it. It would obviously be perfect for Valentine's Day, but I thought it would also make a cute Christmas card with the addition of a little hand-drawn sprig of Mistletoe! You have to watch out for that stuff you know...people can be pretty sneaky hanging it throughout the house in order to sneak a little kiss! lol The design papers are from Bo Bunny. The "Meet Me Under The Mistletoe" tag is something I found in my stash while I was hunting for an embellishment to fill the upper corner of my layout...how perfect is it for this image?? I love it when that happens! I added some little jingle bells I recently picked up at the dollar store to the bow tied with my Bow-Easy. I thought the little snippets of red ribbon would be just right to tie in the red bow on the mistletoe I drew, as well as the lettering on the tag...now I'm second guessing that colour choice a bit. Red is not a colour I would normally put with purple. Hmmm. Probably won't put them together again. I'm now suffering a bit from that "hindsight is 20/20" syndrome. :) Anybody else ever afflicted with that?? lol

I printed the digital image "Steal a Kiss" on Neenah Smooth Cardstock and coloured it with Copic makers. I also did a little experimenting shading with some old Prismacolour pencils I've had kicking around since my high school years...and no, I'm not going to clarify how long that's been, lol. ;) I used some baby oil and a paper blending stump after I was finished using my markers...it's really important to colour with your markers first, as you will ruin the nibs if you try colouring over pencil crayon. (However, don't fret if you should happen to ruin a nib, as they are replaceable. It's just an extra expense that is nice to avoid if possible.) I sponged around the image with Bundled Sage and Walnut Stain Distress Inks. I also added some additional shading with a brown Prismacolour pencil, and blended it out with the baby oil.

We'd love to have you join in with our challenge this month! All projects can be submitted on Crissy' Post ...just look for the Blue Inlinkz frog at the bottom of her post. Crissy has changed a few things up this month in regards to prizes....here's what she had to say:
I'm going to do something a little different for blog candy with this month's challenge! In the spirit of Christmas and giving, I am going to give away one digital image to the first 12 players! AND I am opening up the contest to include EVERYONE (not just for those using one of my images)!! So if you are one of the first twelve players to link up your Christmas/winter card on here, you will get your choice of one of my digital images from either Whimsy or Squigglefly! How fun is that! Now to keep it fair, you must make a card specifically for this challenge. Any cards that are "back-linked" will not qualify. And, if you don't make it in the race for top twelve, you can still have a chance to win at the end of this month. I'll still draw a name (using Random.org) from the participants, and that lucky person will get to choose 2 images of their choice from my collection. So what are you waiting for!! Ready, set, get crafting!!
Today is my turn to post over at Sundays With Crissy. This month, Crissy is giving us the choice of two challenge topics...Christmas is Coming or Winter is Here!! I thought I would sneak in one final Christmas Card this year. I chose to work with one of Crissy's images that she drew for Wags 'n Whiskers Stamps...this is "Steal a Kiss". I adore this cute image, and have been waiting for a chance to use it. It would obviously be perfect for Valentine's Day, but I thought it would also make a cute Christmas card with the addition of a little hand-drawn sprig of Mistletoe! You have to watch out for that stuff you know...people can be pretty sneaky hanging it throughout the house in order to sneak a little kiss! lol The design papers are from Bo Bunny. The "Meet Me Under The Mistletoe" tag is something I found in my stash while I was hunting for an embellishment to fill the upper corner of my layout...how perfect is it for this image?? I love it when that happens! I added some little jingle bells I recently picked up at the dollar store to the bow tied with my Bow-Easy. I thought the little snippets of red ribbon would be just right to tie in the red bow on the mistletoe I drew, as well as the lettering on the tag...now I'm second guessing that colour choice a bit. Red is not a colour I would normally put with purple. Hmmm. Probably won't put them together again. I'm now suffering a bit from that "hindsight is 20/20" syndrome. :) Anybody else ever afflicted with that?? lol
I printed the digital image "Steal a Kiss" on Neenah Smooth Cardstock and coloured it with Copic makers. I also did a little experimenting shading with some old Prismacolour pencils I've had kicking around since my high school years...and no, I'm not going to clarify how long that's been, lol. ;) I used some baby oil and a paper blending stump after I was finished using my markers...it's really important to colour with your markers first, as you will ruin the nibs if you try colouring over pencil crayon. (However, don't fret if you should happen to ruin a nib, as they are replaceable. It's just an extra expense that is nice to avoid if possible.) I sponged around the image with Bundled Sage and Walnut Stain Distress Inks. I also added some additional shading with a brown Prismacolour pencil, and blended it out with the baby oil.
We'd love to have you join in with our challenge this month! All projects can be submitted on Crissy' Post ...just look for the Blue Inlinkz frog at the bottom of her post. Crissy has changed a few things up this month in regards to prizes....here's what she had to say:
I'm going to do something a little different for blog candy with this month's challenge! In the spirit of Christmas and giving, I am going to give away one digital image to the first 12 players! AND I am opening up the contest to include EVERYONE (not just for those using one of my images)!! So if you are one of the first twelve players to link up your Christmas/winter card on here, you will get your choice of one of my digital images from either Whimsy or Squigglefly! How fun is that! Now to keep it fair, you must make a card specifically for this challenge. Any cards that are "back-linked" will not qualify. And, if you don't make it in the race for top twelve, you can still have a chance to win at the end of this month. I'll still draw a name (using Random.org) from the participants, and that lucky person will get to choose 2 images of their choice from my collection. So what are you waiting for!! Ready, set, get crafting!!
Being later in the month, we have of course far exceeded the first twelve entries, so the "earlybird" prize is no longer up for grabs. However, our lovely Crissy's Crew member Zoe, owner of Make It Crafty, has added an additional prize for the winner! She will be contributing her brand new digital image "Stairway to Heaven"...it is a gorgeous background digital stamp that would work beautifully with many of Crissy's images!
Well friends, this will likely be my last post before Christmas as I plan to spend the next several days with family and friends. (unless I can find a little pocket of crafty time!!) I would like to take this opportunity to wish you all a very Merry Christmas!! May you enjoy this time with loved ones, and create memories to treasure in the years to come as we celebrate this wonderful season...the day that we remember the birth of our Saviour, Jesus Christ. As we remember His humble arrival in that stable so many years ago, may you experience the peace, hope and love this season brings.
God Bless!
Melanie
God Bless!
Melanie
Stamps: "Steal a Kiss" digital stamp by Crissy Armstrong for Wags 'n Whiskers
Ink: Copics, Distress Ink
Paper: Neenah, Bo Bunny, Bazzill
Embellishments: Chipboard tag, ribbon, bells, machine stitching
Tools: Bow Easy
Saturday, December 18, 2010
My Hubby Made His First Card!!!
Yes folks, you read that right! Dean got krafty this week to participate in the Kraftin' Kimmie Stamps challenge...introducing our "Krafty Dudes"! Our challenge this week??? Get a "dude" you know to make a card using a Kraftin' Kimmie Stamp!!! (how much fun is that?? lol)
This week over on the Kraftin' Kimmie Stamps blog, you will see cards by the newest members of our design team, hehe. We all enlisted a guy we know to make a card using one of Kimmie's stamps! Honestly, we've been kind of joking about this idea for quite some time, but with this month's release of "dude" stamps, we thought it would be the perfect time to let some guys in on the fun! These men are such good sports, and they've done a great job on their projects!
So, I am now turning the keyboard over to Dean so he can give you the details on his card!!
Ok...you and your dudes have lots of time to play along in this challenge because we are taking a short break for the Christmas holidays. Our first challenge of 2011 will be on January 8th, so that's plenty of time to convince your guys to get krafty! Just link up his creation at the Kraftin' Kimmie Stamps Blog, and the two of you just may be the lucky winners of this week's prize...Clint The Cowboy!
While you are at the Kraftin' Kimmie Stamps Blog, make sure to check out the krafty work by the rest of our Dudes...and please hop around to leave them some love!! These guys rock, and we want to express our appreciation for their willingness to participate in this hobby that we all love so much. Thanks guys!!!
Just a reminder that today is your last chance to take advantage of the Kustomer Appreciation Special over at the Kraftin' Kimmie Stamps Shop! Also, the store will be closed from December 23rd to December 27th and again from December 30th to January 4th.
Blessings,
Melanie (and Dean!)
This week over on the Kraftin' Kimmie Stamps blog, you will see cards by the newest members of our design team, hehe. We all enlisted a guy we know to make a card using one of Kimmie's stamps! Honestly, we've been kind of joking about this idea for quite some time, but with this month's release of "dude" stamps, we thought it would be the perfect time to let some guys in on the fun! These men are such good sports, and they've done a great job on their projects!
So, I am now turning the keyboard over to Dean so he can give you the details on his card!!
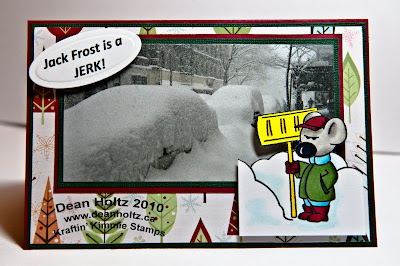
Well, I guess after a year or so, watching my wife make cards, I thought I'd give it a try. I'm actually not a terribly creative person visually, which is why I don't attempt visual ( other than photography ) art. I looked at some of Melanie's cards to get some ideas. So here I was with a few choices of stamps from Kraftin' Kimmie and I chose this guy ( Shovelling Miles...uh...almost an unintentional double entendre ) because of the attitude on his face. Really, he's the exact opposite of me. I LOVE winter, and I LOVE snow, including shovelling it...well from my driveway anyways. This is why, despite our recent winter storm, I have the cleanest driveway in town. Bone dry, down to the cement!
Back to the card. I don't know all the technical jargon, so pardon my ignorance. Melanie gave me a quick tutorial on shading, so I used two to three related colour shades, using Copic markers, to provide some depth to the image. I wanted Miles to be colourful, yet matching the colours on the paper I chose. Personally, I wasn't fond of most of the papers and found the card layout to be more intimidating than the colouring. I felt like his expression begged for a story, which could be accomplished with a picture. I looked through my own images, but wasn't satisfied with the composition of any of them to use with Miles. So to Google images I went and found this picture. I think, ironically, it was taken recently from the storm in London last week. I cropped the image to a more panoramic composition and calculated the proper size to fit on the card ( 4"x6" ). The use of a picture was intentional to incorporate my visual artistic passion, being photography. I also had no idea how to fill the card with out it looking stupid.
I originally selected a paper with candy canes on it, but discarded that, and only used this paper with snowflakes and Christmas Trees. I layered accent colours for both the main border paper and for the photo itself. I then thought it would be neat to raise the stamped image off the paper with these little cushion sticky thingies...they work pretty good. Given that it was a cartoonish coloured image on a photograph, it seemed fitting to physically separate it further. I was momentarily stuck on the sentiment, and wanted to make use of Miles apparent disdain for the situation at hand. And then this sentiment came to mind. I wanted a thought bubble, but due to time constraints, I used Mel's CuttleBug and cut out this oval and embossed it for the sentiment. I also raised it using the sticky thingies. Most people where we live would agree with the statement on this card. I, however, do not. So this card is really going out for all you anti-winter, summer lovers.
Really, I couldn't have done this without Mel's guidance. I wouldn't have even known where to start. Thanks babe!
Please enjoy!
I want to say a big thanks to Dean and all the other Krafty Dudes who played along this week! Dean is a pretty creative guy...both with photography and music, so it was fun to see him branch out into a new creative outlet. He cracked me right up when he told me what sentiment he had come up with for this Miles stamp...a little cheeky, but oh so funny!! I also giggled a bit when he asked me for those "cushion sticky thingies" (stampers, we know them as "pop dots", hehe) to pop Miles up from the background!Ok...you and your dudes have lots of time to play along in this challenge because we are taking a short break for the Christmas holidays. Our first challenge of 2011 will be on January 8th, so that's plenty of time to convince your guys to get krafty! Just link up his creation at the Kraftin' Kimmie Stamps Blog, and the two of you just may be the lucky winners of this week's prize...Clint The Cowboy!
While you are at the Kraftin' Kimmie Stamps Blog, make sure to check out the krafty work by the rest of our Dudes...and please hop around to leave them some love!! These guys rock, and we want to express our appreciation for their willingness to participate in this hobby that we all love so much. Thanks guys!!!
Just a reminder that today is your last chance to take advantage of the Kustomer Appreciation Special over at the Kraftin' Kimmie Stamps Shop! Also, the store will be closed from December 23rd to December 27th and again from December 30th to January 4th.
Blessings,
Melanie (and Dean!)
Thursday, December 16, 2010
Krista's Got Candy!!!
Hey folks! Just popping in quickly this morning to let you all know that my very good friend and fellow Kraftin' Kimmie Krafty Girl Krista (aka Crafty Little Pigtails) has got some amazing blog candy!! Take a look:

The details for entering are on her post. It is open until January 2, 2011. Krista is super sweet and super talented, so make sure to grab a cup of tea or coffee and spend some time checking out her gorgeous work!!
That's it for me today. I have to apologize for being a little (or a lot, lol) MIA here on my blog. December is such a busy month....parties, company, dinners, shopping, recitals, plays...the list goes on and on! Unfortunately, I've had very little crafty time these last couple of weeks. I have been sneaking in a bit of time to work on my upcoming project for Sundays With Crissy, so I can promise you that I will be back on December 22 with a card. I will try to have another post or two before the end of the year, but I will be back to my regular blogging schedule come January!! (I've got some new January stamps to play with, and you are going to LOVE them!!)
Blessings,
Melanie
Monday, December 13, 2010
December News at Kraftin' Kimmie Stamps!!
Wow...it's a VERY snowy morning here today!! Last week, I was complaining that all the snow storms completely missed us. Well, I have nothing to complain about now, lol. Snow, snow and more snow is what's in the forecast today!
Did you all know that the brand new December stamps were released yesterday at Kraftin' Kimmie Stamps?? Several of us Krafty Girls have taken the month of December off, and Kimmie has some amazing Krafty Guests to fill in for us...they have done an outstanding job showcasing these new stamps!! You can find all the new stamps at the Kraftin' Kimmie Stamps Online Store. For those of you wishing to get your inky paws on the entire release, just click on the "Gimmie Kimmies Kits" option...you can purchase the release as sets and at a discounted price!
HOLIDAY SPECIAL ALERT!! For the next week, Kimmie is having a little special to thank all of her loyal customers who shop with at her store throughout the year!!! It's called Kimmie's Kustomer Appreciation!!! All orders of $50 or more before shipping and taxes, will receive a FREE STAMP of our choosing!!! That's right!! It will be a surprise gift, so no requests, please. This special runs from Sunday, December 12th to Saturday Decemer 18th!!!
Have a wonderful day friends...and stay warm!
Blessings,
Melanie
Friday, December 10, 2010
The Town Scrapper's Prima Ballerina (and an encouraging word on colouring mishaps!)
Good afternoon friends! Time for the weekly Town Scrapper Challenge...this week we're calling for you to use Spellbinders Nestabilities on your project! I've also got a little surprise for you today...my project features a sneak peek of a soon to be released exclusive Town Scrapper Victoria Case Stamp! (Fair warning...this is a long post today!! So feel free to grab a cup of coffee or tea and get comfy!! lol)
There are a few new stamps on their way to the Town Scrapper shelves...this one is my absolute favourite! I have a soft spot for ballerina stamps as one of my daughter Ainsleigh's passions is dance. She started ballet at the tender age of four, and she will be turning eleven in January. Over all those years, her love of ballet has only grown. I love watching her dance...we recently had observation week at her studio and the Christmas Open House is fast approaching. This ballerina stamp by Victoria Case is so beautiful, and I just had to colour her the moment I got my hands on her. :)
I decided to make a shaped card this week...Nestabilities are perfect for this! For the card base, I used the largest die in the Labels 8 set. The ballerina was stamped on Neenah Smooth cardstock with Memento Ink and coloured with Copic markers. The design paper is all from My Mind's Eye (Holly Jolly). She was pop-dotted on layers created with Spellbinders Petite Ovals Small and Labels 10. I topped it all off with bow...tied of course with my Bow Easy. For finishing touches, I added some Stardust Stickles, a few rhinestones and a sentiment from Whimsy Stamps. (I used Spellbinders Petite Ovals Small and Fancy Tags for the sentiment.)

Copics: Skin: E000, E00, E11, R20 Hair: E50, E31, E33, E37, E59 Crown: YR31, Y17, E35 Tutu: R20, R22, R27, R46, E59, G82, G85, G99
I absolutely LOVE this stamp, and this ballerina will definitely be making an encore appearance on my blog! She is so versatile and I cannot wait to ink her up again soon. :)
Ok...here's where I'm going to share about my colouring conundrums. (LOVE that word!! lol) Sometimes, I run into problems while colouring but I'm usually too stubborn to start over. I tend to keep working at something until it is "passable" in my eyes. This little ballerina was giving me quite the difficult time! First of all, my paper seemed to act a little funny...it does that once in a while. There are spots on her tutu where the ink behaved badly and refused to blend or lay down smoothly. I also didn't achieve the highlights and depth of shadow that I was attempting to create. Stardust Stickles to the rescue there...I coated her tutu with them!! I had planned to do that anyways, but I hoped it would help conceal some of those troublesome areas too. I also had MAJOR issues colouring up the ballerina's tights...they ended up being my greatest point of frustration. I just couldn't get the right combo for the "ballet pink" shade I was going for...my daughter Ainsleigh only wears those tights like three times a week, so you'd think I'd be able to nail it. NOPE. I just kept layering colour upon colour upon colour...with no success. It kind of turned into a big mess. So, in the end I just decided to give her red tights (went over everything with my R27)...not at all what I wanted, but I didn't have time to start over. I also ended up loosing all of the shading I had been working on. Then I figured her pink pointe shoes looked silly with the red tights, so I made them green. Again, this was not what I had pictured but sometimes you have to change plans to salvage a project. SIGH.
I am sharing this with you friends, because we ALL have difficulties and frustrations with projects sometimes. We have grand visions of how our project will turn out, and sometimes the end product just doesn't measure up to our expectations. We usually just post our "best" stuff...but I think sharing some of our pieces that presented us with difficulties is beneficial too. Making mistakes is all part of the learning process...and I make a TON of them!! Don't be discouraged though...it is just colouring after all. You can always start fresh again tomorrow, armed with the new knowledge you have acquired through trial and error. My best advice when you're frustrated??? Walk away! lol Have a cup of tea and forget about your colouring for little bit. Return when you are refreshed, calm and ready to tackle it again. Also, make sure that you have the free time to sit and colour for a while...if you are rushed and feel pressure to "get it done", then chances are you may not be colouring at your best. My project today is a prime example of this...my time was tight, and so I rushed it a little. In the end, I made errors that ended up costing me more time in the long run. Had I tried out my colour combos on a scrap piece of paper first, perhaps I would have ended up with the results I had first envisioned. Remember...this is ultimately supposed to be fun and relaxing!! For me, it is also typically a stress-reliever...a way to unwind at the end of the day. If you're not smiling while colouring, just take a break. Be encouraged...and never craft angry. hehe
We'd love to have you play along with our Nestabilities Challenge this week...you just may be the lucky winner of a brand new Town Scrapper Victoria Case stamp! If you are in need of some new Nestabilities, Phebe has a wonderful selection of Spellbinders at The Town Scrapper and right now, ALL NESTABILITES ARE CURRENTLY 35% OFF. You can contact her by telephone at 519-882-0623 or via email at info@townscrapper.com to arrange a visit or to place an order. She also has many other wonderful stamp companies and product lines in stock...just perfect for all those crafty loved ones on your Christmas list. :)
Thanks so much for stopping by today friends, and I hope you enjoy the rest of your Friday!!
Blessings (and happy crafting!!),
Melanie
Stamps: Town Scrapper exclusive Victoria Case "Ballerina", Whimsy Stamps sentiment
Ink: Memento, Copics, Black Soot Distress Ink
Paper: Neenah, Bazzill, My Mind's Eye (Holly Jolly)
Embellishments: Rhinestones, Ribbon, Stardust Stickles
Tools: Spellbinders Petite Ovals Small, Labels 8, Labels 10, Fancy Tags, Bow Easy
There are a few new stamps on their way to the Town Scrapper shelves...this one is my absolute favourite! I have a soft spot for ballerina stamps as one of my daughter Ainsleigh's passions is dance. She started ballet at the tender age of four, and she will be turning eleven in January. Over all those years, her love of ballet has only grown. I love watching her dance...we recently had observation week at her studio and the Christmas Open House is fast approaching. This ballerina stamp by Victoria Case is so beautiful, and I just had to colour her the moment I got my hands on her. :)
I decided to make a shaped card this week...Nestabilities are perfect for this! For the card base, I used the largest die in the Labels 8 set. The ballerina was stamped on Neenah Smooth cardstock with Memento Ink and coloured with Copic markers. The design paper is all from My Mind's Eye (Holly Jolly). She was pop-dotted on layers created with Spellbinders Petite Ovals Small and Labels 10. I topped it all off with bow...tied of course with my Bow Easy. For finishing touches, I added some Stardust Stickles, a few rhinestones and a sentiment from Whimsy Stamps. (I used Spellbinders Petite Ovals Small and Fancy Tags for the sentiment.)
Copics: Skin: E000, E00, E11, R20 Hair: E50, E31, E33, E37, E59 Crown: YR31, Y17, E35 Tutu: R20, R22, R27, R46, E59, G82, G85, G99
I absolutely LOVE this stamp, and this ballerina will definitely be making an encore appearance on my blog! She is so versatile and I cannot wait to ink her up again soon. :)
Ok...here's where I'm going to share about my colouring conundrums. (LOVE that word!! lol) Sometimes, I run into problems while colouring but I'm usually too stubborn to start over. I tend to keep working at something until it is "passable" in my eyes. This little ballerina was giving me quite the difficult time! First of all, my paper seemed to act a little funny...it does that once in a while. There are spots on her tutu where the ink behaved badly and refused to blend or lay down smoothly. I also didn't achieve the highlights and depth of shadow that I was attempting to create. Stardust Stickles to the rescue there...I coated her tutu with them!! I had planned to do that anyways, but I hoped it would help conceal some of those troublesome areas too. I also had MAJOR issues colouring up the ballerina's tights...they ended up being my greatest point of frustration. I just couldn't get the right combo for the "ballet pink" shade I was going for...my daughter Ainsleigh only wears those tights like three times a week, so you'd think I'd be able to nail it. NOPE. I just kept layering colour upon colour upon colour...with no success. It kind of turned into a big mess. So, in the end I just decided to give her red tights (went over everything with my R27)...not at all what I wanted, but I didn't have time to start over. I also ended up loosing all of the shading I had been working on. Then I figured her pink pointe shoes looked silly with the red tights, so I made them green. Again, this was not what I had pictured but sometimes you have to change plans to salvage a project. SIGH.
I am sharing this with you friends, because we ALL have difficulties and frustrations with projects sometimes. We have grand visions of how our project will turn out, and sometimes the end product just doesn't measure up to our expectations. We usually just post our "best" stuff...but I think sharing some of our pieces that presented us with difficulties is beneficial too. Making mistakes is all part of the learning process...and I make a TON of them!! Don't be discouraged though...it is just colouring after all. You can always start fresh again tomorrow, armed with the new knowledge you have acquired through trial and error. My best advice when you're frustrated??? Walk away! lol Have a cup of tea and forget about your colouring for little bit. Return when you are refreshed, calm and ready to tackle it again. Also, make sure that you have the free time to sit and colour for a while...if you are rushed and feel pressure to "get it done", then chances are you may not be colouring at your best. My project today is a prime example of this...my time was tight, and so I rushed it a little. In the end, I made errors that ended up costing me more time in the long run. Had I tried out my colour combos on a scrap piece of paper first, perhaps I would have ended up with the results I had first envisioned. Remember...this is ultimately supposed to be fun and relaxing!! For me, it is also typically a stress-reliever...a way to unwind at the end of the day. If you're not smiling while colouring, just take a break. Be encouraged...and never craft angry. hehe
We'd love to have you play along with our Nestabilities Challenge this week...you just may be the lucky winner of a brand new Town Scrapper Victoria Case stamp! If you are in need of some new Nestabilities, Phebe has a wonderful selection of Spellbinders at The Town Scrapper and right now, ALL NESTABILITES ARE CURRENTLY 35% OFF. You can contact her by telephone at 519-882-0623 or via email at info@townscrapper.com to arrange a visit or to place an order. She also has many other wonderful stamp companies and product lines in stock...just perfect for all those crafty loved ones on your Christmas list. :)
Thanks so much for stopping by today friends, and I hope you enjoy the rest of your Friday!!
Blessings (and happy crafting!!),
Melanie
Stamps: Town Scrapper exclusive Victoria Case "Ballerina", Whimsy Stamps sentiment
Ink: Memento, Copics, Black Soot Distress Ink
Paper: Neenah, Bazzill, My Mind's Eye (Holly Jolly)
Embellishments: Rhinestones, Ribbon, Stardust Stickles
Tools: Spellbinders Petite Ovals Small, Labels 8, Labels 10, Fancy Tags, Bow Easy
Thursday, December 9, 2010
Kraftin' Kimmie News!!!
Good morning friends!! Miss Kraftin' Kimmie very sweetly offered to let her Krafty Girls take the month of December off, but it's still business as usual over at Kraftin' Kimmie Stamps! It's release time again, and this month Kimmie has a great lineup of Krafty Guests (along with a couple of the Krafty Girls) to help showcase the new December stamps!!
Previews begin today, and will continue through to the official release day this Sunday...and of course there will also be a blog hop on Sunday to celebrate!!
So make sure to hop on over the the Kraftin' Kimmie Stamps Blog each day for a list of who has previews to share with you...the stamps this month are AWESOME as always!! You'll of course see Miles up to some snowy antics, and Annie has brought us a whole crew of "Dudes" for all those guy cards that are often hard to make. I know you're going to love the new December stamps!
Blessings,
Melanie
Friday, December 3, 2010
Let it Snow!
Confession time...I really love the snow! So, I was thrilled with the challenge topic at Wags 'n Whiskers this week...the lovely, sweet and oh so talented Sharon Caudle is challenging all of us to use Snowflakes on our projects this week!
I used the beautiful fairy "Angelica" for my card today. Now, when you stamp Angelica, she is normally sprinkling pretty little fairy stars from her fingers. However, after inking my stamp I used a damp Q-Tip to remove the ink from that part of the rubber. I stamped her on Neenah smooth cardstock and then drew in some little snowflakes with my Copic multiliner. I coloured her to match the fun snowflake patterned paper from Fancy Pants. The blue polka dotted paper is a scrap I had laying around. I also added in some plastic snowflakes that I picked up at the dollar store. (I glammed them up with some additional glitter!) The sentiment is from Motivet stamps. The snowflake pattern on the tag was created with an accessory stamp from High Hopes. (I used Stormy Sky Distress Ink.)

I used plenty of Stardust Stickles on Angelica and sponged around my image with Stormy Sky Distress Ink.

Copics: Skin: E000, E00, E11, R20 Hair: E50, Y21, Y23, Y26, E31, E33, E37, E59 Dress: B91, B95, B97, B99, G20, G21, G28, G99, BG000 Wings: BG0000, BG000, RV000, G20, G21, blender
We would love to have you play along this week! Remember, the WnW prize challenges are now open to projects featuring any stamp! However, if you use a WnW image on your project, you will also be entered into a bonus draw! Hop on over the Wags 'n Whiskers Blog to see the gorgeous snowy projects by the rest of the Divas this week...they are just beautiful! If you are in need of some retail therapy, you can find Wags 'n Whiskers Stamps HERE.
This post is a little sad for me today...this will be my last weekly post for Wags 'n Whiskers Stamps. Lacey and Nikki asked me to join the team as a guest designer back in May. My term was only supposed to be for May and June, but they very kindly offered to have me stay on a while longer. The ladies on the Wags 'n Whiskers design team have been absolutely fabulous to work with...they are all so sweet, and have made me feel so welcome. I am very grateful for the friendships made while on this team. Thank you all so much for having me on board for these last several months...I truly appreciate it!
Thanks for stopping by today friends!
Blessings,
Melanie
Stamps: Wags 'n Whiskers "Angelica", Motivet sentiment, High Hopes snowflake
Ink: Memento, Copics, Distress Ink
Paper: Neenah, Bazzill, Fancy Pants
Tools: Bow Easy
Embellishments: Plastic dollar store snowflakes, glitter, Stardust Stickles, rhinestones, pearls, ribbon
Thursday, December 2, 2010
!!!SALE ALERT!!! at Kraftin' Kimmie Stamps!
You saw it right...Miss Kraftin' Kimmie is having a great big sale just in time for all your Christmas Krafty shopping!! Here's all the details:
From December 1 to December 5 ONLY, everything in the ONLINE STORE is 20% off!!! Just use the coupon code KK20 when checking out! This even includes the newest November release stamps!
So make sure to hop on over to the Kraftin' Kimmie Stamps Online Store...this is a sale you don't want to miss!!
Oh...and if you have a moment today, please hop on over to my good friend Krista's blog to wish her a very HAPPY BIRTHDAY!!!!
Blessings,
Melanie
Saturday, November 27, 2010
Seeing Spots
Good morning friends! We've got another new challenge at Kraftin' Kimmie Stamps today...and our hostess is none other than the fantabulous Miss Kraftin' Kimmie herself!! Her challenge this week is "Seeing Spots".

I have a confession to make...I am at NO shortage of polka-dotted paper, lol. I love polka dots, so I tend to pick up a lot of sheets of paper with this pattern! Since the festive mood is in full swing, I decided to use some My Mind's Eye paper from the Holly Jolly collection. I decided to ink up "Miles on Ice"...how cute is he??!! Poor little guy set himself adrift...apparently he didn't use the best judgement on where to stand while using his ice pick, lol. I didn't want this card to be fussy, as I need to add more masculine cards to my collection. The Miles stamps are just perfect for guy cards. I used Kraft cardstock as my base and adhered a couple of dollar store snowflakes that I added a bit of glitter to...guy cards can have glitter, right? Hope so!
Miles was stamped on Neenah Smooth cardstock and coloured with Copic markers. I added some Perfect Puff to the trim on his coat...this stuff is entirely too much fun!!! Just apply heat, and watch it puff right up! I had also applied some Glossy Accents to his little block of ice. Well apparently, Glossy Accents does NOT take to heat very well!! You'll notice that it crystallized, and ended up with a really bumpy, bubbly texture. Now, typically I would have FREAKED. (yes, I've been known to have the odd temper tantrum when I experience a card disaster, lol) However, I think this look kind of works for ice...right??? (please just go with me on this one, k?? lol) Let's pretend that I totally planned for this to happen. :) Funny thing...sometimes your blunders can turn into great discoveries! If you want crystally ice, then just heat up those Glossy Accents! :) Oh, and another lesson learned on this card...the Perfect Puff will tint pink when used beside deep red...look close, and you'll see what I mean. So use with caution next to anything red!

Copics: Miles: E50, E31, E33, E37, E59 Coat: R20, R22, R27, R46, R59 Boots: C10, C9, C7, C5, C3, C1, B60 Ice: a lot of B's, BG's and the colourless blender...sorry, I forgot to write those down
Copics: Miles: E50, E31, E33, E37, E59 Coat: R20, R22, R27, R46, R59 Boots: C10, C9, C7, C5, C3, C1, B60 Ice: a lot of B's, BG's and the colourless blender...sorry, I forgot to write those down
We'd love to have you play along this week...if you make sure to use a Kraftin' Kimmie Stamp on your project, then you could be the winner of the stamps Kimmie used on her amazing card today!! Just link up your project on the Kraftin' Kimmie Stamps Blog...oh, and take a few minutes to have a look at the incredible projects by the rest of the Krafty Girls and Krafty Guests...wow, these ladies are awesome!! Thanks so much to our November Krafty Guests...it has been such fun working alongside all of you, and we really have enjoyed seeing your creations with Kimmie's Stamps! You ladies rock!
In need of some new Kraftin' Kimmie Stamps?? Visit the Kraftin' Kimmie Online Store, and do a little Christmas shopping...for your friends and for yourself. You'll be saving your hubby the work!! (He'll appreciate it...really! lol)
I hope you have a wonderful week friends, and thanks so much for stopping by today!
Blessings,
Melanie
Stamps: Kraftin' Kimmie Stamps "Miles on Ice", High Hopes sentiment
Paper: Neenah, Bazzill, MME
Ink: Memento, Copics
Embellishments: Glossy Accents, Perfect Puff, dollar store snowflakes, glitter
Friday, November 26, 2010
Wrap It Up!!
This week at Wags 'n Whiskers Stamps the fabulous Nikki (co-owner of WnW) has come up with a challenge just perfect for this time of year...Make a gift box, bag or tag!
I am one of those people who loves to wrap gifts. I love picking out pretty papers, cutting, folding and taping it all up so nicely. However, more and more I find we are buying gift cards for people, so my gift wrapping is not quite as labour intensive as before. I used to think gift cards were a lazy gift...but I've since changed my mind. I think my opinion on that changed when my son became a teenager, and started getting picky about his clothing. So, I began to suggest gift cards so that he could just choose for himself. Of course, they ship pretty cheap too for those who need to mail their gifts. I always love receiving gift cards towards my favourite stores too...whether it be a crafty or clothing store. Last year at Christmas, my in-laws gave me a very generous gift card for one of my favourite local crafty stores...I went on quite the spree picking out Spellbinders, Copic markers, papers and other items I had been wishing for!
With this in mind, I thought I would try my hand at making a gift card holder for Nikki's challenge. (It's kind of a box, right??!! Ok...so I stretched on this one!! Lol...I asked permission though, and got the "OK" from the bosses!!)
Back in September, I was at a stamping event where my wonderfully talented and absolutely hilarious friend Andrea Murdock did a make and take with this gift card holder template...I love it!! It's quite easy to make and the possibilities are endless. Thanks Andrea...you rock girlfriend!! I'm sure you could easily whip up a whole bunch of these to have on hand for any occasion...as you can see, mine would suit any occasion. Guess I'll have to pull out the Christmas papers and get going on some for the upcoming holiday season!

Copics: Skin: E000, E00, E11, R20 Hair: E50, E30, E31, E33, E37, E59 Dress: RV000, R83, R85, R89, BG96, BG93, G20, G000, YG11 Wings: Booo, BGoooo, BG93, BG96, Gooo, RV000, R83 Flower: RV000, R83, R85, R89
I stamped "Rosalie" on Neenah Smooth cardstock and coloured her with Copic markers. She was cut out with Spellbinders Labels 2 and popped up with foam squares. The foam squares are necessary on this project because the closure flap tucks in underneath your image panel (see picture below). The cardstock base is a 4 1/4" x 10 3/4" strip scored at 4 1/4" and 8 3/4". So you will end up with 3 sections in your cardstock measuring 4 1/4", 4 1/2" and 2". You will also need to punch a slot in the cardstock for the gift card (see picture of interior), and make sure to only apply adhesive around the perimeter of your patterned paper...or else you will not be able to slip your gift card inside the pocket! All paper edges were sponged with Distress Ink...Antique Linen, Bundled Sage and Walnut Stain. I added in a little tag, jewelry spacer, dollar store pearls and a bow tied with my Bow Easy. Oh, and every fairy needs a healthy dose of Stardust Stickles on her wings...well, I think they do!!
From this angle, you can see how the small flap tucks in under your image panel...it takes a little fiddling to get it just right. I actually doubled up on the foam squares to give more height for the flap to tuck under.

Here's the inside....this is the reverse side of the patterned paper on the front of the card holder. You can see the slot at the top in which I've inserted a gift card. You will want to ensure that your slot is far enough down from the top that you still have room to adhere your paper on the outside. Again, make sure that you only apply your adhesive around the perimeter of your patterned paper on the exterior of the gift card holder...this creates the pocket for your gift card. I used plain white cardstock cut with a smaller sized die of the Labels 2 to give an area to write a little message.

I know you all have gifts to give this year...so get creative with your wrapping and join us for Nikki's challenge at Wags 'n Whiskers Stamps!! Need some inspiration? Hop on over the the WnW Blog to see what the other very talented Divas have been whipping up in their craft rooms! Remember that the WnW challenge prizes are now open to projects featuring any stamp line...but if you use a WnW image on your project, then your name will also be put into a bonus draw!! (You can find them HERE)
Thanks for dropping by today!
Blessings,
Melanie
Stamps:Wags 'n Whiskers "Rosalie"
Paper: Neenah, Bazzill, Fancy Pants (Little Sprouts "Baby's Breath")
Ink: Memento, Distress Inks, Copics
Embellishments: Ribbon, die cut tag, dollar store pearls, jewelry spacer, Stardust Stickles
Tools: Spellbinders Labels 2, Bow Easy
Back in September, I was at a stamping event where my wonderfully talented and absolutely hilarious friend Andrea Murdock did a make and take with this gift card holder template...I love it!! It's quite easy to make and the possibilities are endless. Thanks Andrea...you rock girlfriend!! I'm sure you could easily whip up a whole bunch of these to have on hand for any occasion...as you can see, mine would suit any occasion. Guess I'll have to pull out the Christmas papers and get going on some for the upcoming holiday season!
Copics: Skin: E000, E00, E11, R20 Hair: E50, E30, E31, E33, E37, E59 Dress: RV000, R83, R85, R89, BG96, BG93, G20, G000, YG11 Wings: Booo, BGoooo, BG93, BG96, Gooo, RV000, R83 Flower: RV000, R83, R85, R89
I stamped "Rosalie" on Neenah Smooth cardstock and coloured her with Copic markers. She was cut out with Spellbinders Labels 2 and popped up with foam squares. The foam squares are necessary on this project because the closure flap tucks in underneath your image panel (see picture below). The cardstock base is a 4 1/4" x 10 3/4" strip scored at 4 1/4" and 8 3/4". So you will end up with 3 sections in your cardstock measuring 4 1/4", 4 1/2" and 2". You will also need to punch a slot in the cardstock for the gift card (see picture of interior), and make sure to only apply adhesive around the perimeter of your patterned paper...or else you will not be able to slip your gift card inside the pocket! All paper edges were sponged with Distress Ink...Antique Linen, Bundled Sage and Walnut Stain. I added in a little tag, jewelry spacer, dollar store pearls and a bow tied with my Bow Easy. Oh, and every fairy needs a healthy dose of Stardust Stickles on her wings...well, I think they do!!
From this angle, you can see how the small flap tucks in under your image panel...it takes a little fiddling to get it just right. I actually doubled up on the foam squares to give more height for the flap to tuck under.
Here's the inside....this is the reverse side of the patterned paper on the front of the card holder. You can see the slot at the top in which I've inserted a gift card. You will want to ensure that your slot is far enough down from the top that you still have room to adhere your paper on the outside. Again, make sure that you only apply your adhesive around the perimeter of your patterned paper on the exterior of the gift card holder...this creates the pocket for your gift card. I used plain white cardstock cut with a smaller sized die of the Labels 2 to give an area to write a little message.
I know you all have gifts to give this year...so get creative with your wrapping and join us for Nikki's challenge at Wags 'n Whiskers Stamps!! Need some inspiration? Hop on over the the WnW Blog to see what the other very talented Divas have been whipping up in their craft rooms! Remember that the WnW challenge prizes are now open to projects featuring any stamp line...but if you use a WnW image on your project, then your name will also be put into a bonus draw!! (You can find them HERE)
Thanks for dropping by today!
Blessings,
Melanie
Stamps:Wags 'n Whiskers "Rosalie"
Paper: Neenah, Bazzill, Fancy Pants (Little Sprouts "Baby's Breath")
Ink: Memento, Distress Inks, Copics
Embellishments: Ribbon, die cut tag, dollar store pearls, jewelry spacer, Stardust Stickles
Tools: Spellbinders Labels 2, Bow Easy
Tuesday, November 23, 2010
Little Christmas Angel
Good morning friends! Have you been keeping up with the posts at Sundays With Crissy this month? Each very talented member of Crissy's Crew has a designated day to post, so there is inspiration and gorgeous eye candy to be seen throughout the entire month! This month, Crissy has set a wonderful festive colour challenge of "Red, Green and Gold".


Copics: Skin: E000, E00, E11, R20 Hair: E50, E30, E31, E33, E37, E59 Bird: R22, R27, R46, R59, C10 Gown: B60, C5, C3, C1, C00, blender Wings: B000, BG0000, BG000, B60, blender

I chose to work with one of Crissy's newest digital images from Whimsy Stamps...this is "Little Christmas Angel". I always adore Crissy's illustrations of children...they are so precious! After measuring the Spellbinders Labels 8 die that I planned to use, I resized "Little Christmas Angel" to fit, printed her off on Neenah Smooth cardstock and coloured her with Copic markers. I chose some design paper from My Mind's Eye and used accents of red and gold for the matting and punched border. To pull in some green to fit with Crissy's colour challenge, I sponged around the image and sentiment (from CC Designs) with Bundled Sage Distress Ink. The little flourish in the sentiment is something I drew in myself...mostly to fill the huge gap left when I misjudged the placement of the word "Christmas", lol. I added in some gold flourishes that were made with Spellbinders Doodleparts. The snowflakes were also made with Spellbinders.
In hindsight, I wish I would have coloured her gown with ivory or cream shades just to provide more contrast between the clothing and the wings. I coated both with Stardust Stickles after colouring.
Copics: Skin: E000, E00, E11, R20 Hair: E50, E30, E31, E33, E37, E59 Bird: R22, R27, R46, R59, C10 Gown: B60, C5, C3, C1, C00, blender Wings: B000, BG0000, BG000, B60, blender
We would love to have you join in our challenge this month...you have until midnight on November 30th (EST) to submit your project on Crissy's post HERE. (Just look for the little blue Inlinkz frog at the bottom of her post) If you use one of Crissy's digital images on your project, you will be eligible to win this month's fantastic prize from our wonderful sponsor LSL Diversified. Take a look:
Crissy will also be giving the winner 3 of her digital images from either Squigglefly or Whimsy Stamps! You can purchase Crissy's digital stamps from Wags 'n Whiskers, Whimsy Stamps or Squigglefly.
Make sure to become a follower over at Sundays With Crissy so that you never miss a post by one of the lovely members of Crissy's Crew...we still have a few more post to come this month!
Have a wonderful day friends...and thanks for stopping by!
Blessings,
Melanie
Stamps: Whimsy Stamps "Little Christmas Angel" by Crissy Armstrong, CC Designs sentiment Paper: Neenah, Bazzill,
Ink: Copics, Distress Ink
Embellishments: Kaisercraft brads, dollar store pearls, Stardust Stickles
Tools: Spellbinders Labels 8 and Snowflakes, Martha Stewart border punch
Saturday, November 20, 2010
Gettin' "Krafty" with the Krafty Girls!!
Happy weekend!!! Today marks the start of another new challenge at the Kraftin' Kimmie Stamps Blog, and this time it's my turn to play hostess. :) My challenge is called "Gettin' Krafty with the Krafty Girls"...I want to see you using Kraft cardstock on your projects this week! (clever, no??? lol)
This is "Christmas Clara"...I love this stamp, and wanted to have another chance to use her this holiday season. I used Kraft cardstock as my card base and pulled out some gorgeous vintage style papers from My Mind's Eye (Holly Jolly)...oh and a little strip of holly patterned paper from Basic Grey (Wassail). The "Merry Christmas" sentiment is actually from Whimsy Stamps, and the little tag is from the Holly Jolly paper pack...there were a bunch of patterned die cuts in the paper pack. (Picked that up at Scrappin' Great Deals back in September!) The glitter snowflake is from the ornament section at the Dollar Store, and I adhered a Christmas brad that I've had kicking around since last year. The little red pearls were not quite the right colour, so I coloured them with my R59 Copic marker. I also used a Martha Stewart border punch on the black cardstock.

"Christmas Clara" was stamped on Neenah Smooth cardstock and coloured with Copic markers. Last time I coloured her I made her a brunette, so I thought it would be a nice change to give her blonde hair this time. :) I gave the Nutcracker and her hair bows a nice coat of Stardust Stickles, and then popped her up on foam squares.

Copics: Skin: E000, E00, E11, R20 Hair: E50, Y21, Y23, Y26, E31, E33, E37, E59 Dress and bows: R22, R27, R46, R59 Nutcracker: E51, E53, E57, R22, R27, R46, R59, YG00, G20, G94, G99, C9, C5, C3
I hope you plan to play along with the challenge this week...if you use a Kraftin' Kimmie Stamp on your project, then you could be the lucky winner of "Christmas Clara", the stamp I used on my card today!! Just link up your projects at the Kraftin' Kimmie Stamps Blog...and while you're there, make sure to check out all the amazing Krafty Kreations by the incredibly talented Krafty Girls!
In need of some new Kraftin' Kimmie Stamps?? Check out the online store HERE...and remember, that the "Gimmie Kimmie Kits" from the November release are still available for a limited time!
"Christmas Clara" was stamped on Neenah Smooth cardstock and coloured with Copic markers. Last time I coloured her I made her a brunette, so I thought it would be a nice change to give her blonde hair this time. :) I gave the Nutcracker and her hair bows a nice coat of Stardust Stickles, and then popped her up on foam squares.
Copics: Skin: E000, E00, E11, R20 Hair: E50, Y21, Y23, Y26, E31, E33, E37, E59 Dress and bows: R22, R27, R46, R59 Nutcracker: E51, E53, E57, R22, R27, R46, R59, YG00, G20, G94, G99, C9, C5, C3
I hope you plan to play along with the challenge this week...if you use a Kraftin' Kimmie Stamp on your project, then you could be the lucky winner of "Christmas Clara", the stamp I used on my card today!! Just link up your projects at the Kraftin' Kimmie Stamps Blog...and while you're there, make sure to check out all the amazing Krafty Kreations by the incredibly talented Krafty Girls!
In need of some new Kraftin' Kimmie Stamps?? Check out the online store HERE...and remember, that the "Gimmie Kimmie Kits" from the November release are still available for a limited time!
Blessings,
Melanie
Melanie
Stamps: Kraftin' Kimmie Stamps "Christmas Clara", sentiment from "Jingle Bell Ride" from Whimsy Stamps
Paper: Neenah, Bazzill, MME, Basic Grey
Ink: Memento, Copics, Black Soot Distress Ink
Embellishments: Pearls, Stickles, die cut tag, material brad, dollar store snowflake ornament
Tools: Martha Stewart border punch
Friday, November 19, 2010
Lavender and Lace
Oh, I am soooo late with this post! I must thank Lacey (and Nikki too!) for her patience with me...I've had some unexpected things come up that required my attention, and so my post had to take a back seat today. Better late than never though...right??
Welcome to another challenge at Wags 'n Whiskers Stamps!! Our challenge this week is "Lavender and Lace".
I decided to pull out one of my favourite Wags 'n Whiskers Stamps, "Say a Prayer" for this challenge. I have to admit that "lavender" is not a colour I have an abundance of in my paper collection. I searched through my papers several times for anything lavender, or even purple, and found this pretty polka-dotted paper from My Mind's Eye (Wild Asparagus). I also found a little scrap of polka-dotted paper from KaiserCraft that I used to paper peice the dress on this beautiful stamp. I chose to use some crocheted "lace"...this is one of my personal favourite embellishments. For finishing touches I distress the edges of the paper with my scissors and Milled Lavender Distress Ink, pulled out a Martha Stewart paper punch, added a few pearls, Prima Hydrangeas, Stardust Stickles, ribbon and a metal sentiment tag from the dollar store. I really wanted to add some machine stitching...another favourite embellishment of mine, but I've run out of white thread! (It's on my shopping list for this weekend, lol)

"Say a Prayer" was stamped with Memento Ink on Neenah Smooth cardstock and coloured with Copic markers. The paper-pieced dress was shaded with Copic markers. When paper-piecing, always remember to add some shading to your patterned paper. Otherwise, those areas of your image will just look flat.

Welcome to another challenge at Wags 'n Whiskers Stamps!! Our challenge this week is "Lavender and Lace".
I decided to pull out one of my favourite Wags 'n Whiskers Stamps, "Say a Prayer" for this challenge. I have to admit that "lavender" is not a colour I have an abundance of in my paper collection. I searched through my papers several times for anything lavender, or even purple, and found this pretty polka-dotted paper from My Mind's Eye (Wild Asparagus). I also found a little scrap of polka-dotted paper from KaiserCraft that I used to paper peice the dress on this beautiful stamp. I chose to use some crocheted "lace"...this is one of my personal favourite embellishments. For finishing touches I distress the edges of the paper with my scissors and Milled Lavender Distress Ink, pulled out a Martha Stewart paper punch, added a few pearls, Prima Hydrangeas, Stardust Stickles, ribbon and a metal sentiment tag from the dollar store. I really wanted to add some machine stitching...another favourite embellishment of mine, but I've run out of white thread! (It's on my shopping list for this weekend, lol)
"Say a Prayer" was stamped with Memento Ink on Neenah Smooth cardstock and coloured with Copic markers. The paper-pieced dress was shaded with Copic markers. When paper-piecing, always remember to add some shading to your patterned paper. Otherwise, those areas of your image will just look flat.
Copics: Skin E000, E00, E11, R20 Hair: E50, Y21, Y23, Y26, E31, E33, E37, E59 Ribbon: C00, C01, C03, C05 Wings: BG0000, V000, RV000, blender Shading on dress: V000, V01, V12, V15, V09
We'd love to have you join in the "Lavender and Lace" challenge this week! You can link up your submission on the Wags 'n Whiskers Challenge Blog...you can also check out all the beautiful cards that the WnW Divas created this week. They are just stunning!
Remember, that the Wags 'n Whiskers Challenges are now open to submission featuring any stamps line. However, if you do use a WnW stamp on your project, then your name will also be entered into a bonus draw for a WnW digital stamp!
Thank you so much for stopping by today friends. It means so much to me that you all continue to keep looking in on my little blog...and your sweet words are so encouraging. :)
Have a wonderful Friday evening, and I hope to see you back tomorrow!
Blessings,
Melanie
Stamps: Wags 'n Whiskers "Say a Prayer"
Ink: Memento, Milled Lavender Distress Ink, Copic markers
Paper: Neenah, Bazzill, MME, KaiserCraft
Embellishments: Prima flowers, pearls, Stickles, ribbon, metal sentiment tag
Tools: Martha Stewart border punch
Running a little late...
Good morning folks!
I'm running a bit behind schedule today due to some unexpected things that came up last night, and will be late getting my card posted for the Wags 'n Whiskers Challenge.
I will be back later this afternoon with my card, but in the meantime please hop on over the Wags 'n Whiskers Blog to check out the gorgeous projects by the rest of the DT for our "Lavender and Lace" challenge this week.
Hope to see you back later today!
Blessings,
Melanie
Monday, November 15, 2010
A SugarPlum Christmas
Welcome to another Showcase Monday at The Town Scrapper! I was going through my stamps, wondering what I should work with for today's Showcase when I came across this adorable CC Designs SugarPlum stamp called "Ornament Trevor " and he had yet to be inked up... gasp!!! I think I acquired him last year, just after Christmas, so little Trevor has been waiting patiently in his package for a chance to come out and play! It was a bit of a treat for me too, as I completely forgot that I had him...kind of like finding some money in a coat pocket that's been put away since last season. Gotta love finding "treasure"! :)


The pretty paper on my card today is from Imaginesce. The ribbon and jingle bells are dollar store finds. I decided to use some X-Press It Blending Cardstock in place of my beloved Neenah Smooth Cardstock. Everybody in "blogland" seems to LOVE this new paper...including my 10 year old daughter Ainsleigh! (she has actually requested that I keep buying this paper for her, even if I choose to stick with my Neenah, lol) I've had a few sample sheets kicking around for a while now, but personally I've not been thrilled with my previous attempts at colouring on it...I found that I just was not achieving the same depth that I did with the Neenah paper. However, I'm determined to give this paper a fair chance...I usually take a while to adjust to change. So, I think I'll keep playing around with the X-Press It on occasion before I make any final decisions...as of right now, I'm not ready to make the big switch. I'm still a "Neenah girl". :) Paper really is a personal preference...I have friends who love Beckett, Bristol, Canson, Wassau and X-Press It. You really have to try out different papers to find out which works the best for you. I did find that it was easier to create texture in the hair on this paper...since it is not as soft and absorbent as Neenah, the marker strokes tend to remain a bit crisper or more defined. Sometimes, it's easy to over-blend on the Neenah, which is something you want to avoid when you are looking to create texture with your marker strokes.
I used some Distress Ink in Bundled Sage to sponge around the edges of the paper. Phebe has a great selection of Distress Inks at The Town Scrapper...I love these inks, and I rarely make a card without reaching for them. Stardust Stickles were applied to Trevor's ornaments.
Copics: Skin: E0000, E000, E00, E11, R20 Hair: E50, E30, E31, E33, E37, E59 Clothes: G20, G82, G85, G99, B91, B95, B97, B99, E40, E41, E42, E43, E47 Shoes: E50, E5, E21, E25, E47 Ornaments: Y00, Y11, Y21, Y23, YG00, YG11, G14, G05, BG0000, BG10, BG11, BG72, BG75, R20, R22, R27, R46, R59
Make sure to check out what the other Scrapettes have created for today's Showcase on The Town Scrapper Blog...these ladies always make such gorgeous projects with the product lines available at The Town Scrapper.
To arrange a visit to The Town Scrapper or to place an order, you can contact Phebe via telephone at 519-882-0623 or by email at info@townscrapper.com.
Have a wonderful Monday...and thanks for stopping by!!
Blessings,
Melanie
Stamp: CC Designs "Ornament Trevor"
Ink: Memento, Copics, Bundled Sage Distress Ink
Paper: X-Press It, Bazzill, Imaginesce
Embellishments: Ribbon, bells, Stardust Stickles
Sunday, November 14, 2010
November Release Blog Hop at Kraftin' Kimmie Stamps!!
I always get so excited for release day at Kraftin' Kimmie Stamps!! This month, Kimmie has another fantastic batch of stamps that I know you are going to love...there are six new "Krafty Girls" by artist Annie Rodrigue (each comes with a co-ordinating sentiment and accessory stamp) and five new Miles the Mouse stamps by artist Steven Leary (two of these stamps also come with sentiments). The stamps are now available for purchase, and Kimmie has put together a fantastic blog hop today to celebrate...complete with prizes!! The Krafty Girls, our FABULOUS Krafty Guests and our LOVELY Junior Krafty Girls have been busy creating some gorgeous projects for today's blog hop...just wait until you see them!

Melanie's Card:
The hop begins over at the Kraftin' Kimmie Stamps Blog, where you will find a complete list of all the blogs on today's hop. As you travel around, make sure to leave comments on each and every blog for your chance to win a package of the new stamps!
If you arrived here after visiting the super sweet and very talented Angie, then you are on the right track! If not, just start over at the Kraftin' Kimmie Stamps Blog so that you don't miss out on any of the blogs...everybody's projects are fantastic and I know you will want to see each and every one!
My card today features "Lavender the Quilter" by Annie Rodrigue. This stamp brings back so many great memories from when I was little. I have never been much of a quilter, but my mom and both my grandmothers made beautiful quilts. I used to love visiting my grandmother as a little girl...and I was always excited to see her big quilting hoop set up in her living room. She used to let me "hide" under the folds of all the material while she stitched away...it was my little "fort". I very much appreciate all the hours of work that go into handmade quilts...they are such a work of art. Lavender has obviously been a very busy quilter...just look at that beautiful patchwork design! Those pretty papers are from My Mind's Eye (So Sophie). The weight and texture of these papers is wonderful.

"Lavender" was stamped with Memento Ink on Neenah smooth cardstock and coloured with Copics. Walnut Stain Distress Ink was applied to all paper edges with my Inkssentials Blending Tool. Lavender also comes with the sentiment "You're Sew Sweet", and two accessory stamps...a thimble and a pincushion.

Copics...quite a long list today! Skin: E000, E00, E11, R20 Hair: E50, E30, E31, E33, E37, E59 Dress: RV000, V00, V01, V91, V93, BV29 Chair: E50, E40, E41, E42, E43, E47, Quilt: Yellow Blocks: E50, Y21, Y23, Y26, YR31, E33 Teal Blocks: BG000, BG10, BG11, BG72, BG75 Green Blocks: G20, BG93, BG96, B99 Mauve Blocks: RV000, V01, V91, V95, R83
"Lavender" was stamped with Memento Ink on Neenah smooth cardstock and coloured with Copics. Walnut Stain Distress Ink was applied to all paper edges with my Inkssentials Blending Tool. Lavender also comes with the sentiment "You're Sew Sweet", and two accessory stamps...a thimble and a pincushion.
Copics...quite a long list today! Skin: E000, E00, E11, R20 Hair: E50, E30, E31, E33, E37, E59 Dress: RV000, V00, V01, V91, V93, BV29 Chair: E50, E40, E41, E42, E43, E47, Quilt: Yellow Blocks: E50, Y21, Y23, Y26, YR31, E33 Teal Blocks: BG000, BG10, BG11, BG72, BG75 Green Blocks: G20, BG93, BG96, B99 Mauve Blocks: RV000, V01, V91, V95, R83
I also have a special guest on my blog today....my daughter and Junior Krafty Girl Ainsleigh!! I always love spending crafty time with my daughter for these blog hops...we have a great time colouring up the images together. :) Ainsleigh's favourite image from this release is "Annie the Artist". Ainsleigh is quite the little artist herself...she spends hours a week creating beautiful illustrations. Ainsleigh stamped "Annie" on Neenah paper and coloured her with my Copic markers. "Annie's" easel actually comes blank, so you can add whatever you like to her canvas. Ainsleigh loves drawing Manga characters, so she decided to add a pretty Manga eye to her canvas...I think it's FANTASTIC! Ainsleigh picked out some fun papers from Echo Park for her card, and added a hand-written sentiment. She also decided to try her hand at colouring on some X-Press It Blending Cardstock. Ainsleigh LOVES this paper for colouring...I'm still undecided on it, lol. She has requested that I keep buying it for her. :)
Beautiful job my dear!! Ainsleigh prepared her own sketch ahead of time...she even had it labelled with colours for her carstock choices. :) I'm thinking I may have her design some sketches for me sometime. I really love her choice of black cardstock for matting...it really makes those bright colours in the paper pop!
After you are done hopping around, make sure to stop by the Kraftin' Kimmie Stamps Online Store to do some Krafty Shopping!! For those of you who just "gotta have it all", you will once again have the option to buy the new Moonlight Whispers stamps or the new Miles the Mouse stamps as complete sets, and at a discounted price to boot!! Just click on the "Gimmie Kimmies Kit" option...easy one-click shopping!!
Ok, time for me to send you off to visit my dear friend Krista's blog...just wait until you see what gorgeous project she has created with one of the new November images!! Oh, and don't forget to leave those comments!
Thanks for joining in the fun today...enjoy the rest of the hop!
Blessings,
Melanie
Melanie's Card:
Stamps: Kraftin' Kimmie Stamps "Lavender"
Ink: Memento, Copics, Distress Ink in Walnut Stain
Paper: Neenah, Bazzill, My Mind's Eye (So Sophie)
Embellishments: Prima flowers, machine stitching, pearls
Tools: Corner rounder punch
Ainsleigh's Card:
Stamps: Kraftin' Kimmie Stamps "Annie"
Ink: Memento, Copics
Paper: X-Press It, Bazzill, Echo Park
Saturday, November 13, 2010
"Funky Fibres"...and another sneak peek!!
Happy weekend!! It's an even happier weekend because tomorrow is the official release of the brand new November Kraftin' Kimmie Stamps!!!
We have a double-your-fun challenge this Saturday at the Kraftin' Kimmie Stamps Blog, because all the Krafty Grils and Krafty Guests are also giving you one last sneak peek at the new stamps on their cards today! Our wonderful hostess today is none other my lovely friend and fellow Krafty Girl Krista VanTol . Krista is quite the clever gal...her challenge is called "Funky Fibres" and it fits in beautifully with several of the brand new "Krafty Girl" stamps by artist Annie Rodrigue!
Today, I have used the lovely "Sabrina the Spinner" on my card...I LOVE this stamp! I have never personally attempted to "spin" wool, but I think it would be a lot of fun! I can picture Sabrina sitting in her log cabin...or maybe even her "soddie" (did you read the "Little House" series when you were younger??)...quietly spinning the fleece into yarn while a lovely fire is crackling away in the fireplace. Sometimes I think it would be wonderful to live in a simpler time without all the hectic schedules, cell phones and noise...but electricity, plumbing and medical advances are enough to put a halt to those thoughts! lol The design paper is from My Mind's Eye (So Sophie). I wove some "funky" yarns through the crocheted trim, and also used the yarn to fill the little wooden spools that came in a package of fun buttons.

"Sabrina" was stamped on Neenah paper with Memento ink and coloured with Copic markers. Her dress was paper-pieced (paper is from Pink Paislee) and then shaded with Copic markers. I'm not thrilled with the background...I was a bit heavy-handed with the Distress Inks. I was also trying out a different light source in these photos...not sure I love it. I think I'll pull out my original light for tomorrow's pictures.

Copics: Skin: E0000, E000, E00, E11, R20 Hair: E50, E30, E31, E33, E37, E59 Shading on dress: E40, E41, E43, E47 Spinning wheel: E50, E41, E43, E47, E25, E99, E59
We'd love to see your "Funky Fibres" submissions this week...if you make sure to use a Kraftin' Kimmie stamp (you can purchase them HERE) on your project, then you could be the lucky winner of "Mona the Seamstress", the stamp Krista used on her stunning card this week! Make sure to visit the Kraftin' Kimmie Stamps Blog to see the fabulous creations by the rest of the Krafty Girls and Krafty Guests!
Make sure to join us tomorrow for the release day blog hop!
Thanks so much for stopping by today friends.
Blessings,
Melanie
Stamps: Kraftin' Kimmie Stamps "Sabrina the Spinner"
Ink: Memento, Copics, Distress Ink (Antique Linen, Walnut Stain)
Paper: Neenah, Bazzill, Pink Paislee, My Mind's Eye
Embellishments: Crocheted trim, yarn, mini wooden spools, ribbon, machine stitching
Friday, November 12, 2010
November Previews...Round Two!!
(This is post #2 for me today! Please feel free to scroll back to see the Wags 'n Whiskers challenge for this week!)

Welcome back for another round of previews for Kraftin' Kimmie Stamps! (Links for all of today's sneak peeks can be found at the Kraftin' Kimmie Stamps Blog.) The official release day is this Sunday, and we will be having our usual release day blog hop...hope you plan to join us! We'll also have one more round of previews tomorrow during our weekly challenge.
My card today features "Mona the Seamstress", one of six new stamps by artist Annie Rodrigue. I adore the old sewing table Mona has...actually, my friend has an antique sewing table that she is giving to me! (I just need to get my van over to her house to pick it up.) It looks very similar to the one sweet Mona has. The papers on my card are from The Paper Loft. I couldn't resist adding some machine stitching to this card, as it is just so fitting...it also happens to be one of my favourite embellishments. :) I had a perfect little antique sewing machine button that has been kicking around in my button stash for a little while now. The little chipboard spool and needle were lightly shaded with my Copic markers, wound with embroidery floss and adhered with Scor Tape.

Mona was stamped on Neenah smooth paper and coloured with Copic makers. Her little spectacles were given a coat of Glossy Accents. Believe it or not, I actually made it through a card without adding Stickles!! lol
Mona was stamped on Neenah smooth paper and coloured with Copic makers. Her little spectacles were given a coat of Glossy Accents. Believe it or not, I actually made it through a card without adding Stickles!! lol
Copics: Skin: E0000, E000, E00, E11, R20 Hair: E50, E30, E31, E33, E37, E59 Clothes: B000, B91, B97, BG000, BG10, Bg72, BG75 Sewing machine and "metal" parts of table: C00, C1, C3, C5, C9 Table: E40, E41, E42, E43, E47, E59 Cloth: G20, BG93, G94
Are you loving these new stamps??? I adore this release...but then again, I adore every release, lol. You won't have to wait much longer...the new November stamps will be available for purchase on Sunday.
In the meantime, hop on over to the Kraftin' Kimmie Stamps Blog to visit the other Krafty Girls and Krafty Guests who have sneak peeks to share with you today!
Thanks so much for stopping by today, and enjoy the rest of your Friday!!
Blessings,
Melanie
Stamps: Kraftin' Kimmie Stamps "Mona the Seamstress"
Ink: Memento, Copics, Walnut Stain Distress Ink
Paper: Neenah, Bazzill, The Paper Loft
Embellishments: Machine Stitching, "Dress It Up" button, embroidery floss, Maya Road chipboard spool and needle, crocheted trim
Tools: Spellbinders
Snow Fairy
This is a tw0-post day on my blog...today is round two of the Kraftin' Kimmie November previews! Please feel free to scroll up to see my sneak peek for today(it will be up at 7:00 am EST)...and for links to the other previews!

Ready for a new challenge at Wags 'n Whiskers Stamps?? Today's challenge is brought to us by the lovely Tracy. She would like to see you using Acetate, Vellum or Tissue on your project. Just wait until you see the gorgeous projects by the rest of the design team over at the Wags 'n Whiskers Blog!
I decided to pull out one of the beautiful WnW fairies...this is "Rhiannon" coloured up as a snow fairy. She is usually perched on a branch, but I eliminated that so that she could be nestled on an arrangement of snowflakes and swirls. This was a fun challenge for me as I rarely use vellum on my cards. I ran strips of vellum and cardstock through my Xyron "sticker maker"...I know that's not the right name, lol. It's a little "X" shaped contraption that you can insert ribbon, paper or other thin embellies through to apply a film of adhesive. I used Spellbinders Doodle Parts to cut out the swirls and then broke out my Ritz Microfine Glitter for the very first time, and applied it to the now sticky vellum and cardstock. I love this glitter! Just burnish it with your finger for a beautiful velvety finish...so pretty! The snowflakes started off as clear plastic. I coated them with glittery "snow" paint, sprinkled them with coarse glitter and topped them off with a rhinestone centre. The pretty DP is from a DCWV Christmas Stack. Finally, I added some random rhinestones for additional sparkle.

Rhiannon was stamped on Neenah cardstock and coloured with my Copics. Those wings were just crying out for some Stardust Stickles...these are the perfect Stickles for fairy wings. They also add to the "frosty" look I was after for this "snow fairy". (The first photo turned out rather bright...it's too "blue". The colours are actually not quite that intense. This second photo is a little more accurate colour-wise...the papers are teal.)
Copics: Skin: E0000, E000, E00, E11, R20 Hair: E50, Y21, Y23, Y26, E33, E37, E59 Clothes: BG0000, BG000, BG01, B14, B37, B99, C00, C1, C3, C5 Wings: BG01, BG000, BG0000, RVooo, blender
We would love to have you play along with our challenge this week. You could be the lucky winner of a WnW stamps! Remember that the Wags 'n Whiskers Challenges are now open to projects featuring ANY stamp line...just link up your project at the Wags 'n Whiskers Blog. Now, if you already own some Wags 'n Whiskers stamps, go ahead and use them in the challenges...those projects featuring a WnW image will be entered into a bonus draw for a WnW digital stamp!
Thanks so much for stopping by today!
Blessings,
Melanie
Stamps: Wags 'n Whiskers "Rhiannon"
Ink: Memento, Copics
Paper: Neenah, DCWV, Bazzill
Embellishments: Ritz microfine glitter, plastic snowflakes, rhinestones, Stardust Stickles, machine stitching
Tools: Spellbinders Ovals, Doodle Parts, Snowflakes
Thursday, November 11, 2010
Time for the November Sneak Peeks at Kraftin' Kimmie Stamps!!
(This is post #2 today...please scroll back to see the lucky winner of my Sweet 'n Sassy Birthday Blog Hop candy!)
November 11. Remembrance Day. This is such an important day on the calender, and I would like to take the opportunity to express my heartfelt thanks to all the men and women who have served to protect our country. My sympathies are extended to all who have lost loved ones to war. To have just one day to express our thanks and appreciation for their selfless service and ultimate sacrifice seems hardly sufficient. I remember that as a child in school, the moment of silence always seemed an eternity. Now it doesn't seem long enough to reflect on what those soldiers went through....what they gave up to protect complete strangers...what they sacrificed for the cause they fought for. Today we thank them. We express our appreciation through silence and reflection, through poems and songs, through memorials and services. Today, I am praying for the soldiers currently serving around the world...and for their families. I pray for strength, protection and wisdom for the soldiers...for strength, peace and comfort for the families. God bless.


November 11. Remembrance Day. This is such an important day on the calender, and I would like to take the opportunity to express my heartfelt thanks to all the men and women who have served to protect our country. My sympathies are extended to all who have lost loved ones to war. To have just one day to express our thanks and appreciation for their selfless service and ultimate sacrifice seems hardly sufficient. I remember that as a child in school, the moment of silence always seemed an eternity. Now it doesn't seem long enough to reflect on what those soldiers went through....what they gave up to protect complete strangers...what they sacrificed for the cause they fought for. Today we thank them. We express our appreciation through silence and reflection, through poems and songs, through memorials and services. Today, I am praying for the soldiers currently serving around the world...and for their families. I pray for strength, protection and wisdom for the soldiers...for strength, peace and comfort for the families. God bless.
Release day is fast approaching at Kraftin' Kimmie Stamps...the big date is Sunday November 14th! :) You are in for quite the treat this month, as Kimmie has some fantastic new stamps lined up for November...you are going to want each and every one! (you know...Christmas is just around the corner, so you can make them part of your wish list this year!!) There are six fabulous "Krafty Girls" by artist Annie Rodrigue as well as several adorable winter Miles the Mouse stamps by artist Stephen Leary. Over the next few days, the Krafty Girls and Krafty Guests will be sharing sneak peeks with you...make sure to visit the Kraftin' Kimmie Stamps Blog each day to see who is participating each day. The official release day is this Sunday. Not only will you be able to buy the stamps that day, but Kimmie also has a great blog hop planned!
Today, I'd like to introduce you to "Annie the Artist"....hmmm, wonder where Kimmie came up with the name for this lovely gal?? ;) lol I am totally in love with Annie Rodrigue's characters this month...they are FABULOUS!! The paper is from the Basic Grey "Olivia" line. The "Colour Me Happy" sentiment comes with "Annie"...she also comes with a little paintbrush accessory stamp.
Today, I'd like to introduce you to "Annie the Artist"....hmmm, wonder where Kimmie came up with the name for this lovely gal?? ;) lol I am totally in love with Annie Rodrigue's characters this month...they are FABULOUS!! The paper is from the Basic Grey "Olivia" line. The "Colour Me Happy" sentiment comes with "Annie"...she also comes with a little paintbrush accessory stamp.
"Annie" was stamped with Memento Ink on Neenah smooth paper and coloured with my Copic markers. Her cute little dress and shoes were jazzed up with some Stardust Stickles. The canvas on her easel is actually blank, so you can have her painting whatever your little heart desires...I chose to sketch in a rose.
Copics: Skin: E000, E00, E11, R20 Hair: C10, C9, C7, C5, C3, C1, B60 Beret: R20, R22, R27, R46, R59 Dress: C00, C1, C3 Easel: E50, E31, E25, E59, E99 Canvas: E50, E30, E31, blender
For more sneak peeks of the soon-to-be-released November stamps, visit the Kraftin' Kimmie Stamps Blog where you will find links to all the participating Krafty Girls and Krafty Guests. Stay tuned over the next few days for more previews, our weekly challenge and the official release day blog hop on Sunday!
Have a wonderful day friends, and thanks so much for visiting!!
Blessings,
Melanie
Stamps: Kraftin' Kimmie Stamps "Annie the Artist" and matching sentiment
Ink: Memento, Copics, Black Soot Distress Ink
Paper: Neenah, Basic Grey, Bazzill
Embellishments: Flowers, button, hemp twine, Stardust Stickles
Winner of my Sweet 'n Sassy Blog Hop Candy!!
(This is one of two posts today... it's time for the Kraftin' Kimmie Stamps November sneak peeks to begin!! Please feel free to scroll up to check out that post!)
Good morning folks! Just popping in quickly to announce the winner of the "Cocoa's Ornament" digital image from the Sweet 'n Sassy Birthday Blog Hop. Drum roll please....
The lucky winner (chosen by random.org) is...
Good morning folks! Just popping in quickly to announce the winner of the "Cocoa's Ornament" digital image from the Sweet 'n Sassy Birthday Blog Hop. Drum roll please....
The lucky winner (chosen by random.org) is...
"GRANDMAFAIRYMARY"!!!
Congrats...I know you will love this sweet festive digital stamp! I'm sure it will be perfect for your holiday crafting. :) Please email me for new your digi stamp! (you'll find my email link through my blogger profile)
I would just like to say a heartfelt thank you to all who participated in the Sweet 'n Sassy celebration...and thank you for all your lovely comments. :) Stay tuned to the other designer's blogs to see if you won their blog candy...and Korin will be posting a complete list of all the winners on the Sweet 'n Sassy Blog this Saturday.
Blessings,
Melanie
Subscribe to:
Posts (Atom)